Are you experiencing regret after updating to the latest macOS? Do you wish to revert back to a previous version without losing any data? Look no further, as here is the solution for you. The latest macOS update brings in an array of exciting features and a superb user experience. However, it is not without its flaws. Many users have encountered issues such as application glitches, frozen screens, slow responsiveness, and even system crashes. If you are facing a sluggish macOS after an update, downgrading to a previous version is a viable option. It is important to note that downgrading incorrectly can lead to data loss. To ensure a safe downgrade, here are six recommended methods that guarantee data preservation.
Part 1: Is it necessary to downgrade MacOS?
In order to fully enjoy the latest MacOS, you need to familiarize its new features. However, it is worth noting that updating MacOS can come with certain issues, as well as potential issues that new MacOS may have, such as software incompatibilities and the horizontal scrolling behavior of Finder.
If you regret to find that MacOS upgrades and major changes are a frustrating issue, you can choose to downgrade MacOS. Doing so will not only remove your annoyance, but also provide you with a more seamless experience. This also works as a solution when the message "This package is not compatible with this version of MacOS" is encountered.
Part 2: How to downgrade MacOS?
Apple company offers six ways to degrade MacOS, including using Recovery mode, Time Machine, bootable Drive, old installer, factory reset, and internet recovery.
The first thing you should do is back up your data. When using previous MacOS, you might have created several files that you wanted to save. What's more, if you haven't done a backup before installing a new MacOS, the new system won't save your data. This is because the next steps involve clearing out your storage. To back up information stored on a disk, you can transfer it to an external hard drive or cloud storage (like Dropbox, Google drive, OneDrive, etc.)
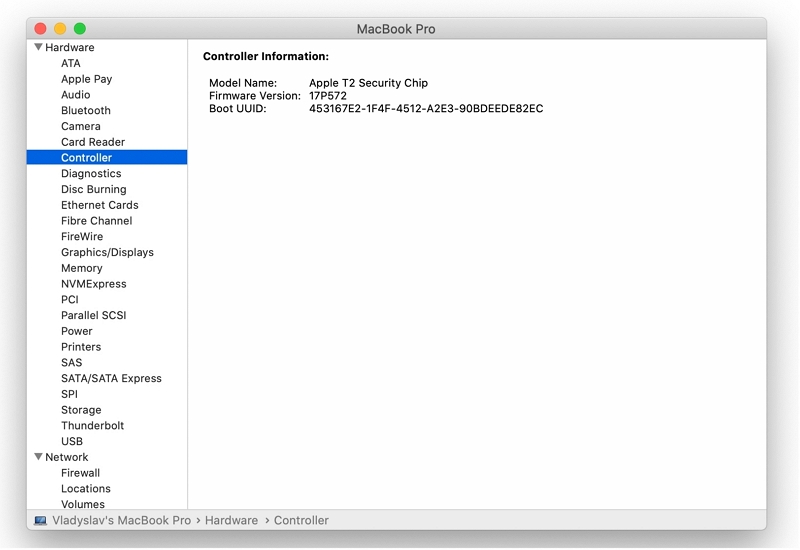
Stpe 1: Check the Apple T2 security chip
The first step is to check if your Mac has the Apple T2 Security Chip. This refers to the iMac Pro, and the MacBook Pro, MacBook Air, and Mac mini models released in 2018 or later.
If you have one, take the following steps:
a. To make sure you own the T2 controller, hold down the Option key and click the Apple menu > in the drop-down menu > System Information > in the sidebar, select the controller (or iBridge) section > If you own the chip, You will see the Apple T2 chip in controller Information on the right.
b. If you have a T2 chip, you'll need to restart your Mac to go into recovery mode to continue downgrading MacOS. So, click the Apple menu > Restart.
When you see the Apple logo on the screen, hold down the “Command + R” until the computer boots into recovery mode. Release these keys when you see the utility window.
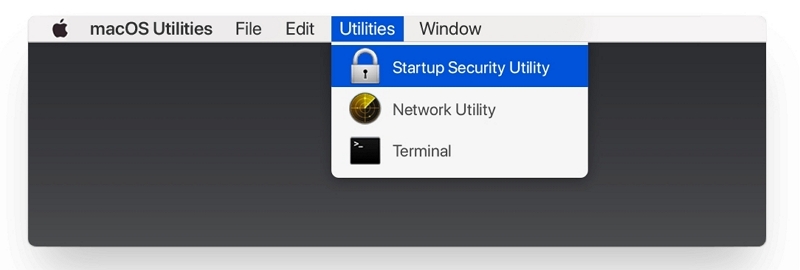
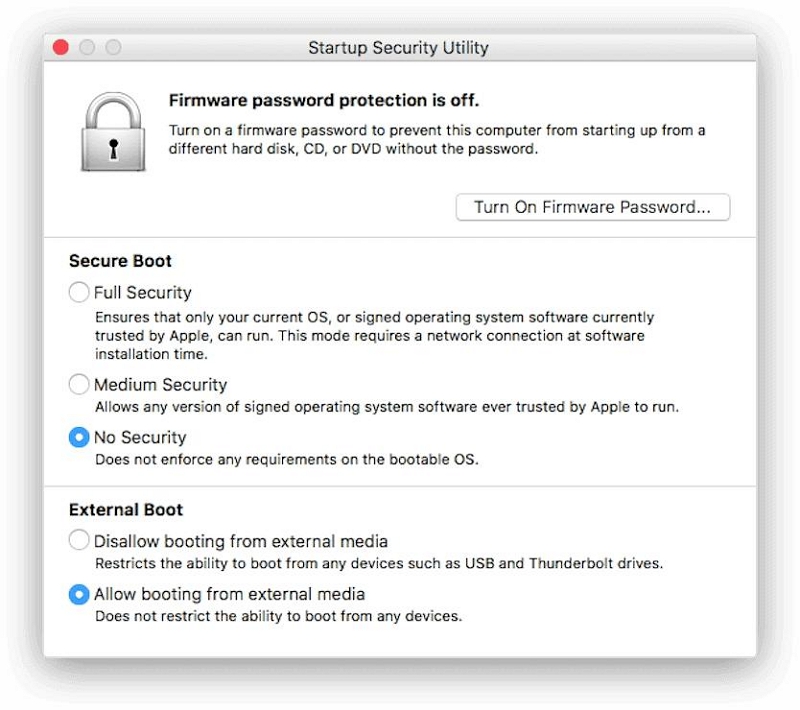
On the menu bar, from the drop-down menu, click Utilities > Select Boot Security Utility > Enter your login password, Apple ID password, or firmware password (if prompted) > In the External Boot section > Allow Boot from External Media to enable the MacOS installation option for the next step.
Step 2: Remove hidden and corrupt apps on your Mac
Sometimes broken plug-ins, caches, junk files, invisible applications, and shadow applications can slow down the entire MacOS. You can remove hidden applications and processes to clean up your system.
But don't worry, there is a very good cleaning tool for you - Macube Cleaner. This is a three-step process to clean up a lot of junk files, system cache, iTunes music, email attachments, duplicate files and large old files, and it even helps you clean up the browser autofill personal information, thus protecting your privacy from being leaked. What's more, it can not only clean files, but also uninstall stubborn malware once and for all, preventing corrupted software and programs from affecting the operation of the system. Isn't that exciting?
Let's take a look.
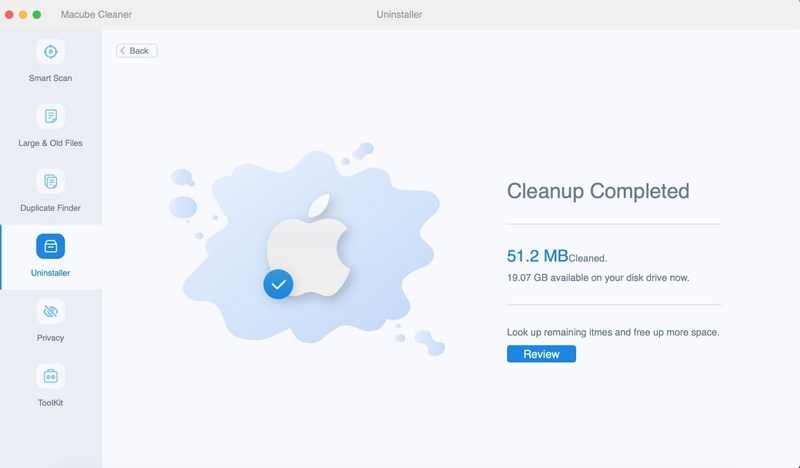
1. Click the Uninstaller on Macube, and select to Scan.
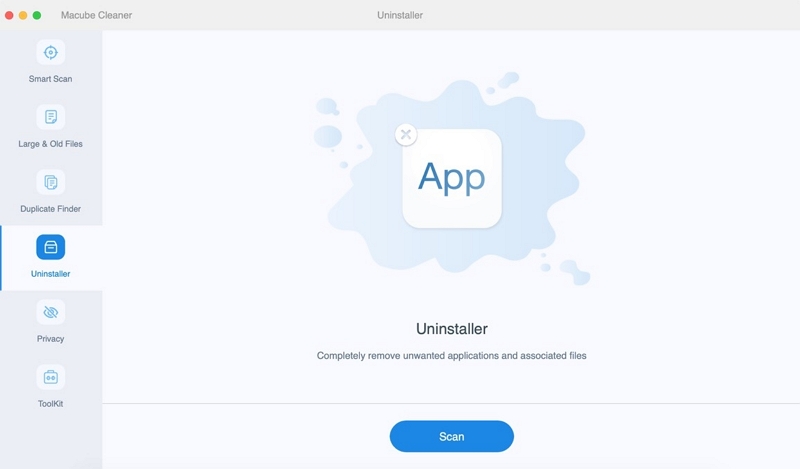
2. Preview the results and select hidden and corrupt apps.
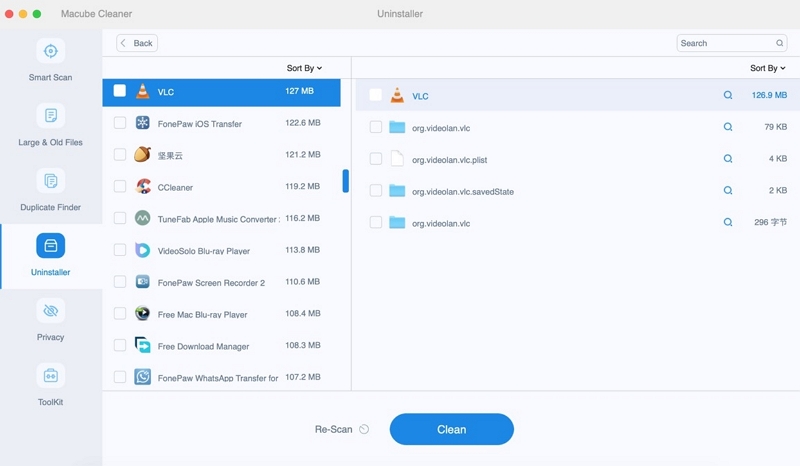
3. Safely delete apps and trace files from your Mac.
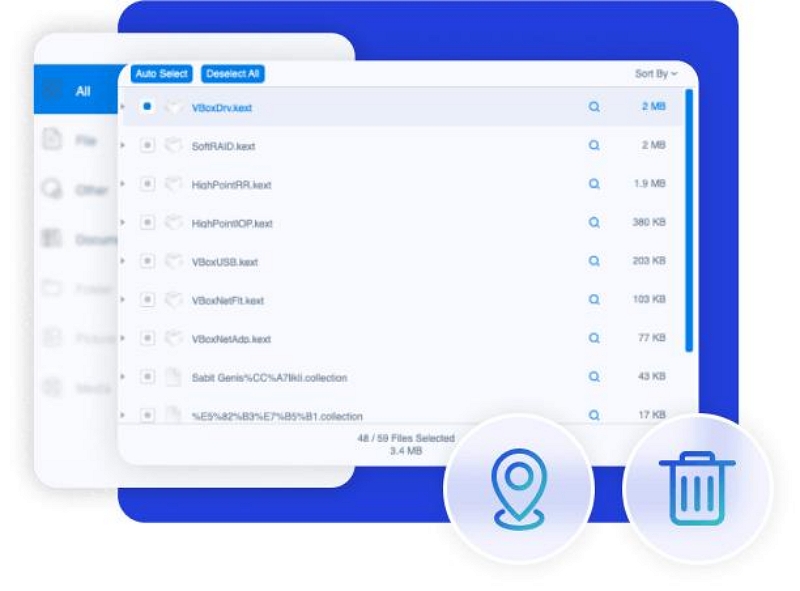
If you want to clean up junk files, click Smart Scan. Then preview and select the junk files, click Clean button. A few seconds later, your mac will free up lots of storage.
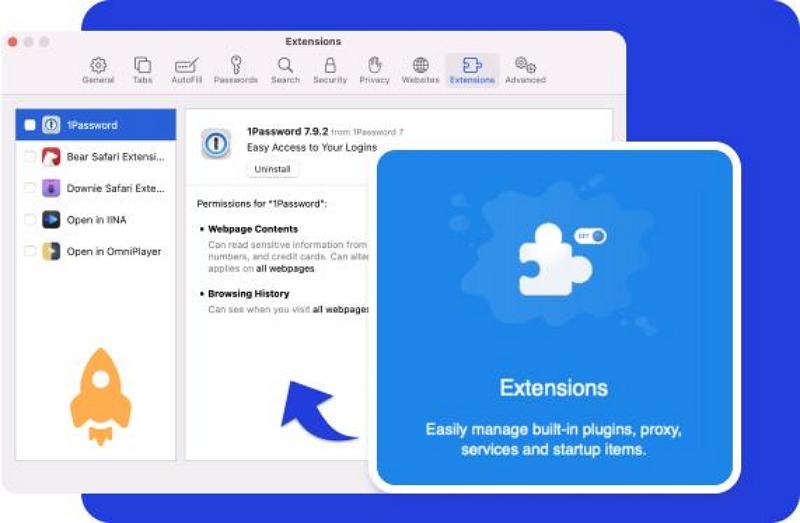
If you want to manage plug-ins, choose Privacy, the fifth project. In here, you can manage and delete plug-ins, proxies, third-party extensions, startup items, Quicklook, and more.
Macube has everything you need.
Step 3: Erase Macintosh HD
It's time to erase all the data from your Mac hard drive. This step is necessary. Why? Because clearing your Mac's hard drive is to make room for the older MacOS you're going to install. If you do not wipe the Mac hard drive, you will face the following two problems, MacOS degrade failed and after the MacOS upgrade, your Mac is performing slowly.
Usually, the startup volume erasure task should be taken in MacOS Recovery mode. Here's how:
Restart your Mac and press and hold the Command + Option + Shift + R keys until the Apple logo appears (or the spinning globe) to boot into MacOS Recovery mode.
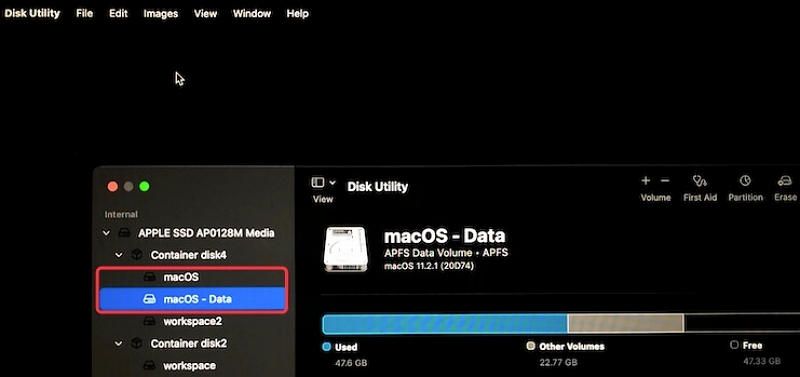
*How to Erase Macintosh HD?
1. Select Disk Utility. Then, right-click the MacOS-Data volume and click Delete APFS Volume.
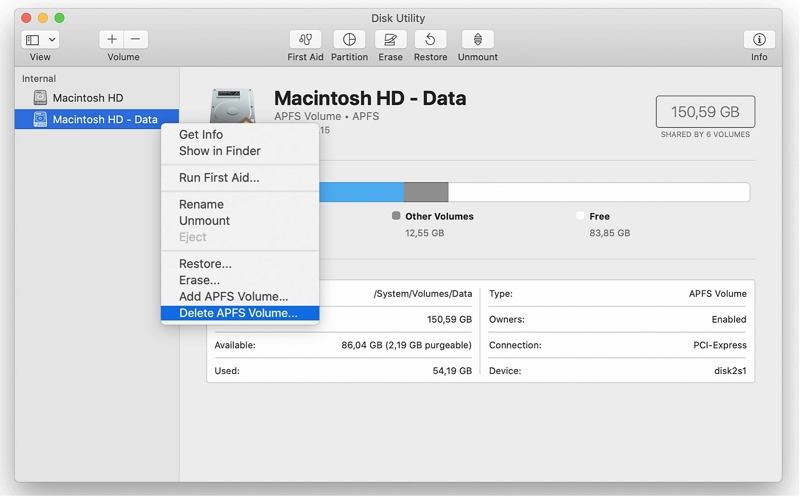
2. Choose the MacOS volume and click Erase.
3. Set a name, choose APFS in the Format: box. Then, click Erase.
The erasing process will take a while, don't do any other operation during the process, or the internal hard drive may be damaged.
Step 4: Reset the NVRAM Mac
If one of the reasons you want to downgrade MacOS is some software issue, it may be related to information stored in NVRAM. Some users have reported that the operating system works perfectly after resetting NVRAM on a Mac and reinstalling the latest MacOS. To reset NVRAM, perform the following steps:
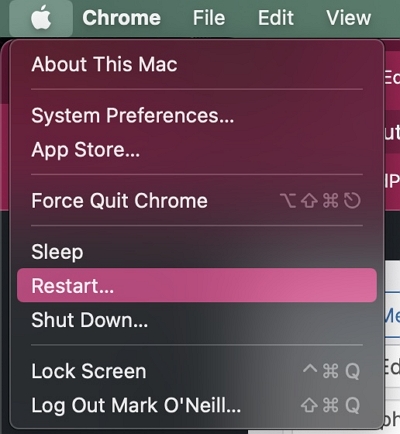
1. Click on the Apple menu and select Restart.
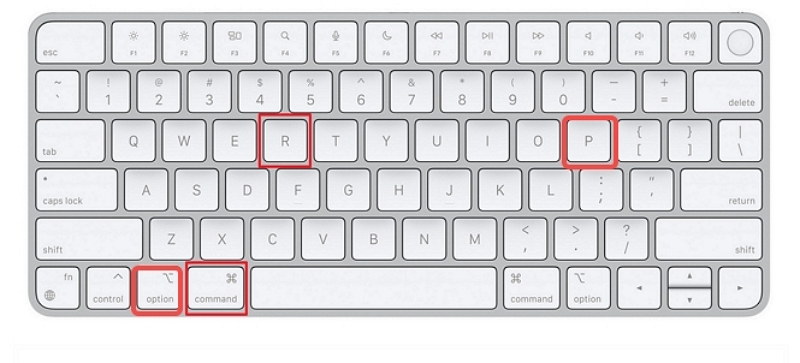
2. Immediately press and hold the Option(Alt) + Command + P + R keys until your Mac restart. It may take about 20 seconds.
You can skip this step, but considering the Mac users’ experience, the NVRAM resetting removes potential bugs, which are helpful for reinstalling MacOS.
Step 5: Downgrade MacOS
With the previous steps in place, the important part of this article comes, how to degrade MacOS.
1st Method: Downgrade with Recovery Mode
The way to degrade MacOS is to use the built-in MacOS Recovery. This method downgrades MacOS to a previous version and does not require a backup of the previous operating system version. However, it does require Internet access, as MacOS Recovery will download previous versions of MacOS during the installation process. The process of degrading a MacOS through MacOS Recovery is similar to reinstalling a MacOS. Please follow these instructions:
1. Shut down your Mac and then power it back on.
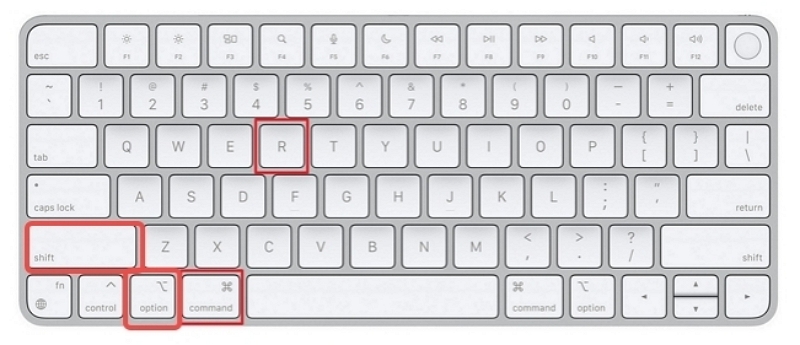
2. As your Mac is booting up, press Shift + Option + CMD + R keys and hold them until the MacOS Recovery loads. The startup will take longer than usual so be patient.
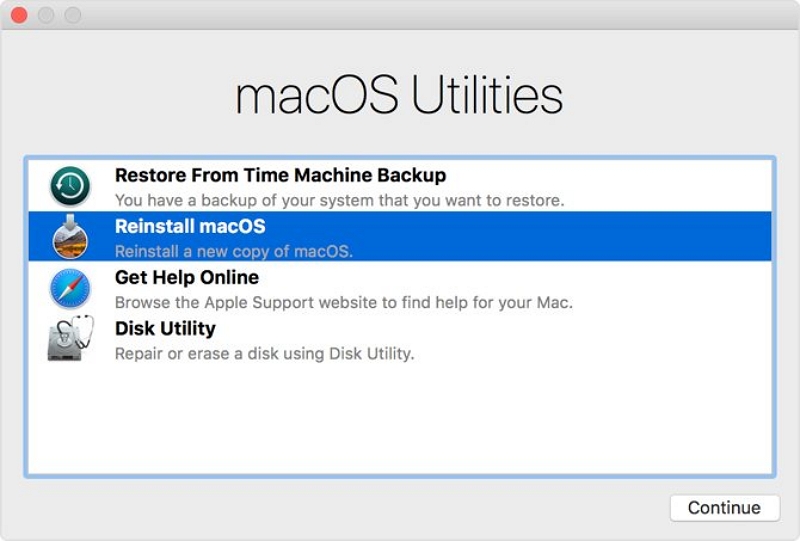
3. Once the MacOS Recovery is loaded, select the Reinstall MacOS option from the MacOS Utilities screen. After that, click on Continue.
4. Follow the onscreen instructions and select your startup disk. Then click on the Install button.
5. Complete the rest of the installation process by following the prompts that appear on the screen.
6. Once the installation is complete, choose your preferred method to restore your backed-up files
2nd Method: Downgrade with Time Machine Backup
If you have backed up your Mac with Time Machine before upgrading to the current version of MacOS, the job of downgrading MacOS will be very easy. This is because the backup contains the original MacOS installation file. After erasing the Macintosh HD in MacOS Recovery, select Disk Utility > Quit Disk Utility and return to the MacOS Utility screen. You can then follow these steps to downgrade to another version of MacOS:
1. Connect the backup drive to your Mac.
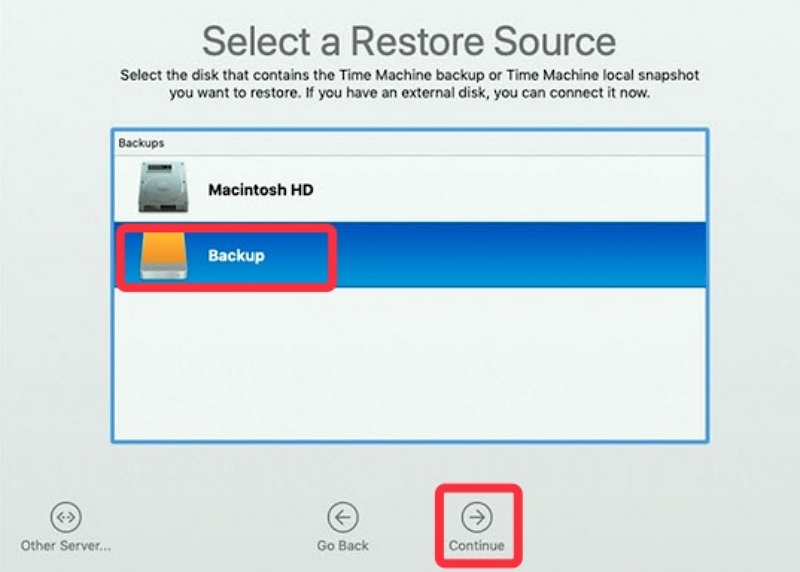
2. In the MacOS Utility screen, select Restore from Time Machine Backup, and then click Continue.
3. Select the backup disk and click Continue.
4. Choose the destination (typically your Mac's internal hard drive) to save your Time Machine backup.
5. Click Restore to retrieve the backup (including the MacOS you want to downgrade to and your personal data).
The recovery process will need some time. You can watch the movie until the process is complete. Then, your Mac mini or other model will automatically restart to run MacOS.
3rd Method: Use a Bootable Drive to Downgrade MacOS
If you have problems with either of the above methods, you can try to degrade MacOS by creating a bootable installer. (The following steps take demoting Big Sur to Catalina as an example.)
1. Create a bootable installer for MacOS Catalina or earlier. Restart your Mac and proceed to create a bootable installer.
Note: If you delete your Mac when you try either of the above methods to demote from Big Sur, you'll need to create a bootable installer on another healthy Mac.
- Prepare an external drive with no less than 14GB in size.
- Erase the external hard drive to APFS in the Disk utility application.
- Download MacOS Catalina or the installation file you need from the App store. (Do not allow the installation process to begin at this time).
Warning: The Mac operating system download process will take a while. During the process, confirm that your monitor is on, the internet is connected, and the Mac is charged.
- Connect your APFS formatted external drive to your Mac.
- Open Finder > Applications > Utilities > Terminal.

- Go to the following command and click Return. Here "My Volume" in the command means where the MacOS installation files will be stored, replace "My Volume" with the name of your external hard drive.
sudo /Applications/Install\ MacOS\ Catalina.app/Contents/Resources/createinstallmedia --volume /Volumes/MyVolume
sudo /Applications/Install\ MacOS\ Mojave.app/Contents/Resources/createinstallmedia --volume /Volumes/MyVolume
- Type your admin password when asked and press Return.
- Enter Y when warning you that it will erase the external hard drive and press Return.
- Wait until see the "Copy complete and Done" notification.
Now, you have created a MacOS Catalina bootable installer.
2. Use the bootable installer to reinstall Catalina or older on Mac
Please confirm the internet connection is okay. Then, follow these steps to use the bootable installer to reinstall MacOS Catalina on your Mac.
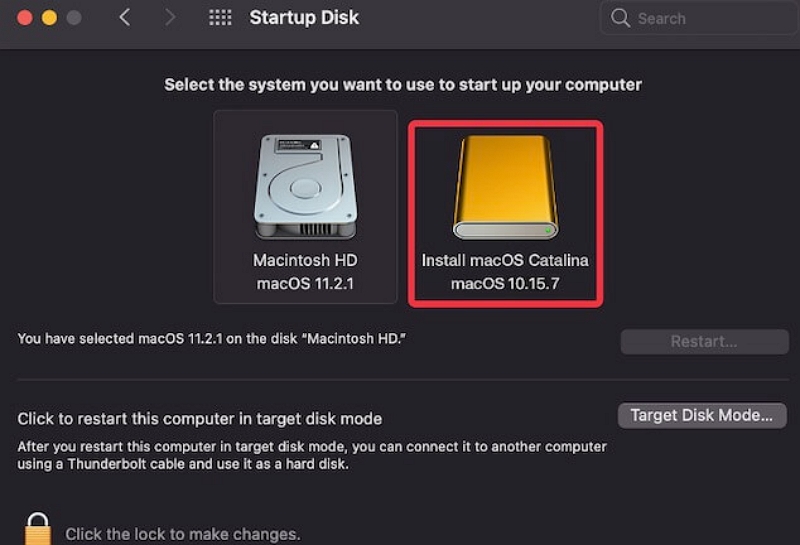
- Restart your Mac while holding the Option key until seeing the list of startup disk options.
- Choose the disk with your target MacOS installer and click Restart.
Then, wait for your MacBook Air or MacBook Pro reboot from MacOS Catalina or another version of MacOS.
4th Method: Use the Old Installer to Roll Back to a Previous Version of MacOS
Before the release of MacOS Mojave, it was possible to download older versions of MacOS directly through the App Store. This is no longer possible with the updated Mac App Store; however, you can still download older MacOS versions through Apple’s Support site. The installer will download through the Software Update section of System Settings and should be available in your Applications folder after.
Once you have the specific MacOS installer downloaded on your Mac, you can use it to create a bootable disk from which you can reinstall an older version of MacOS. This is helpful for users trying to downgrade from MacOS Ventura to MacOS Monterey or older on Apple silicon Macs (M1 and M2 models), as the default Recovery mode only installs the latest version of MacOS.
Moving forward, it’s worth remembering that older MacOS versions are now harder to download. The next time you upgrade, you might want to make a backup of the previous version’s installer, just in case.
For this process, you’ll need a 16GB or larger USB flash drive or external hard drive.
1. Prepare the External Drive
Before you can create the installer, you need to format the drive. If your drive is already formatted, you can skip this section. But remember that your drive needs to be formatted to a compatible file system such as HFS+ or APFS. Here’s what you need to do:
- Plug in your external drive.
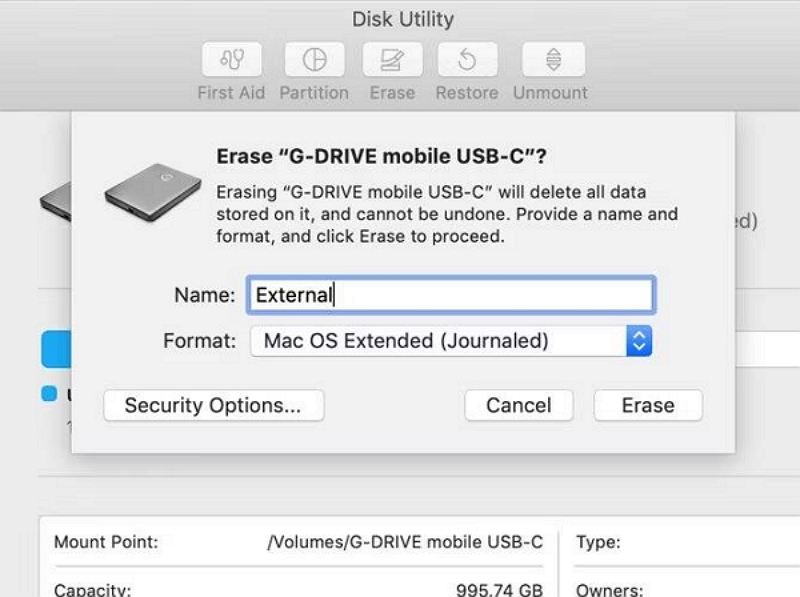
- Launch the Disk Utility app. You can find this with Spotlight (Cmd + Space) or by going to the Applications folder in Finder, then opening the Utilities menu and double-clicking on the app.
- Under External in the list on the left, select your disk and then click the Erase button at the top of the window.
- Under Format, choose either the HFS+ or APFS file system. The best Mac file system to choose depends on what you plan to use it for. If you’re unsure, go with APFS.
- Click Erase, then Done once the process completes.
2. Creating the Installer
You’ll need to follow these steps on the machine that has the installer for the older MacOS version.
- Plug in your formatted external hard drive and launch the Terminal app. You’ll need to enter a command, which will differ based on the MacOS version you’re using.
- If you are going to create a bootable drive for MacOS Ventura, use the command below as it is. Otherwise, replace “Ventura” with the MacOS version name (for example, Monterey or Big Sur):
sudo /Applications/Install\ MacOS\ Ventura.app/Contents/Resources/createinstallmedia --volume /Volumes/Untitled
This will create an installer (named Untitled), which you can use as a bootable disk to install MacOS.
3. Use the Installer
Finally, here’s how to install an older version of MacOS using the installer you just created:
- Shut down the Mac you want to downgrade and plug in the newly created external drive.
- Boot the Mac into Recovery Mode. For Intel Macs, you can do this by holding Cmd + R on startup. On Apple silicon Macs (M1 and M2 models), keep holding the Power button on startup till you see the message Loading Startup Options. On the next screen, select Options to launch Recovery mode.
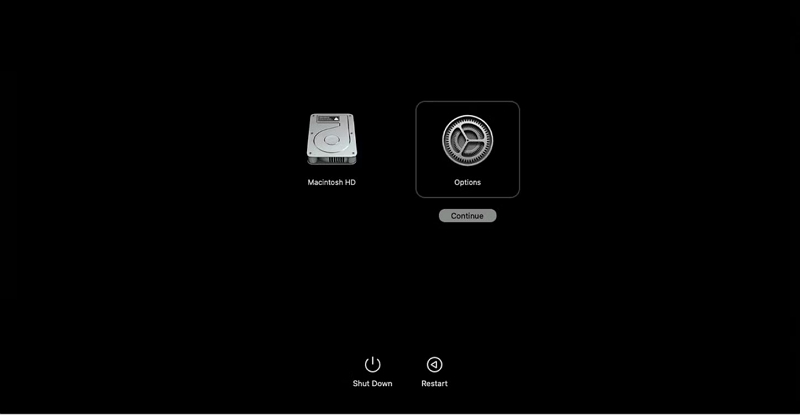
- When the MacOS Utilities screen appears, select Disk Utility

- Select your Startup Disk and click Erase. Choose either the HFS+ or APFS file system for the format.

- Restart the Mac again, but this time holding down Option (Intel Macs) or keeping the Power button pressed (Apple silicon Macs). The Startup Manager will appear. You should see your USB as a bootable disk. Use the arrow keys to select it and press Return on your keyboard.
- Once the installer loads, select Install MacOS.
- Once the installation is complete, you can restore your files from the backup you created.
5th Method: Using Factory Reset to Downgrade MacOS Sonoma/Ventura
If your factory-shipped MacOS version is Monterey, a factory reset is the easiest option to downgrade Sonoma/Ventura. The OS will revert back to the raw MacOS build by factory resetting. This step is the same for both Intel and Apple processors on Mac.
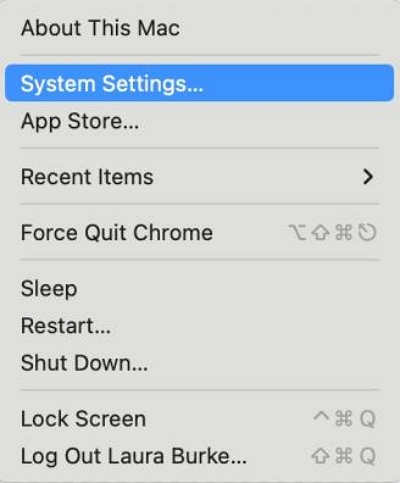
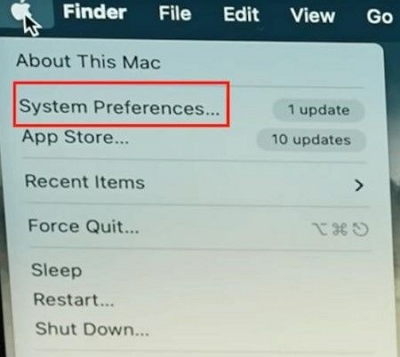
1. Choose “System Preferences” by clicking on the Apple icon at the top left corner of your Mac screen.
2. Select “Erase All Content and Settings” and enter your Mac password for confirmation.
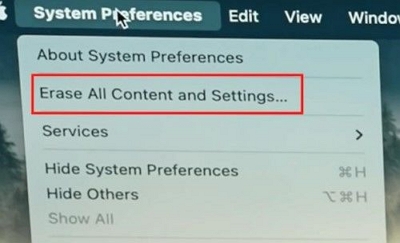
3. Press “Continue” and sign out of your Apple account by entering your password. Select “Erase All Content & Setting” and begin the factory reset process.
Now the downgrading process to Monterey will start. Wait for the language interface to appear, and you can install Monterey.
6th Method: Use Internet Recovery
Importantly, you need to have a stable Internet connection. To use Internet Recovery, take the following steps:
1. Switch your computer on and instantly press and hold the Command + Option + R keys.
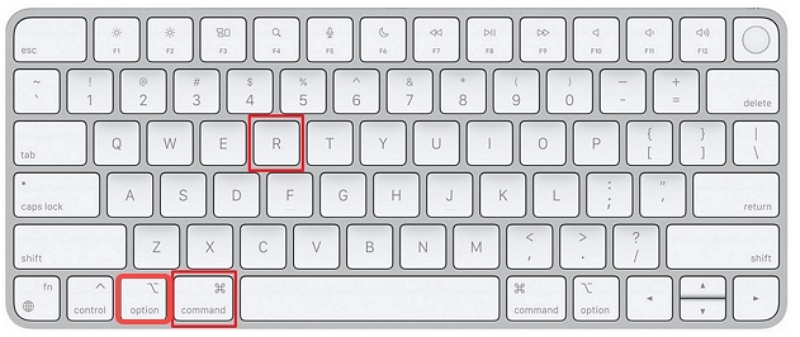
2. You can release the keys as soon as you see a spinning globe and the message Starting Internet Recovery.

3. Then, you should wait a while. Your Mac will check if the factory-preloaded MacOS is still available, and download it or the closest MacOS version. This may spend a few hours. In addition, your Mac will be checked for any hardware issues with memory and disk.
4. When the Utilities window appears, select Reinstall MacOS by following the on-screen instructions.
5. When the process is over, reboot your Mac.
Part 3: How to Recover Data Lost During Downgrading?
If your backup hard drive is lost or doesn't work after downgrading MacOS, you can get help with Eassiy Data recovery.
Eassiy Data Recovery is a powerful software solution designed to assist users in recovering lost, deleted, or formatted data from a variety of devices. These devices include computers, USB drives, SD cards, external hard drives, and more. The software provides two scanning modes, Quick Scan and Deep Scan, enabling users to recover their lost data quickly and efficiently.
One notable feature of Eassiy Data Recovery is its ability to retrieve data from external storage devices. Whether you accidentally deleted important files from an external hard drive, encountered corruption with a USB drive, or experienced data loss, Eassiy Data Recovery can help recover your lost files. To guide you through the process of recovering lost data from an external storage device, let’s discuss the necessary steps.
Free Download Free Download Free Download Free Download
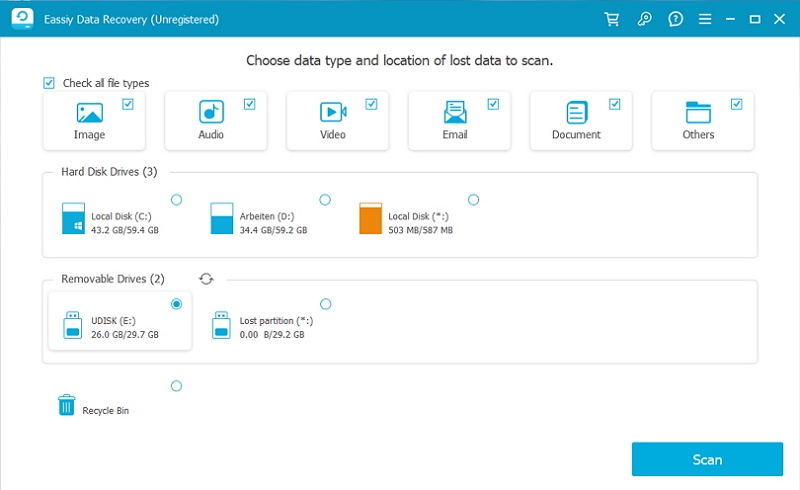
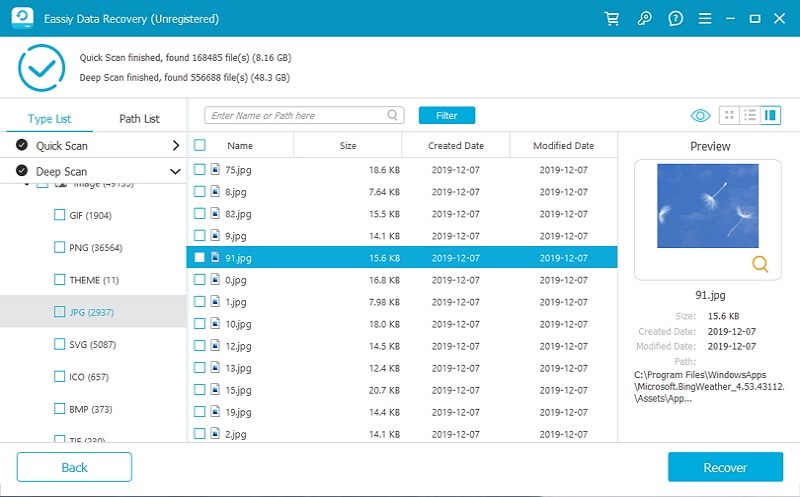
Step 1: Start Eassiy Data Recovery and connect external storage driver to put your deleted data back on your computer. Once connected, Eassiy Data Recovery will automatically detect external drives and add them to a list of drives that can be scanned under the removable drive option.
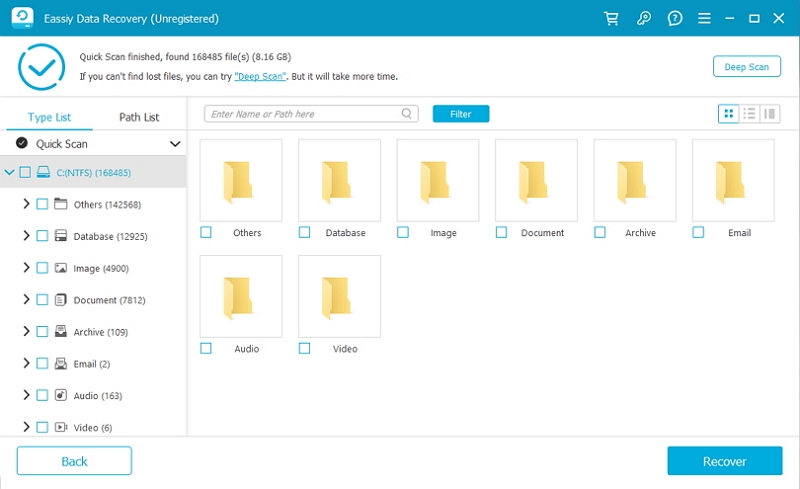
Step 2: Eassiy Data Recovery offers two scan modes: fast scan and deep scan. Fast scans are faster and more suitable for recent data loss, while deep scans are more thorough and recommended for complex data loss situations.
Step 3: After scanning, select the files you want to recover and click the "Recover" button.
Conclusion:
Downgrading macOS without losing data is indeed possible. The essential step is to create a backup of your important files before proceeding with the downgrade using any of the methods mentioned earlier. Time Machine is a recommended tool for backup and the downgrade process. Additionally, Macube Cleaner is suggested for freeing up space to facilitate the system reload. However, if you forget to create a backup before initiating the downgrade, you may need to rely on a data recovery tool to retrieve the lost data. For this purpose, Eassiy Data Recovery is highly recommended. It is user-friendly, efficient, and boasts a high success rate in data recovery.
Macube Cleaner
Speed up and troubleshoot your Mac super easily with a Macube full-featured free trial!
Start Free Trial