Microsoft Teams has undoubtedly become a vital tool for many workplaces, facilitating seamless collaboration and communication. However, there may be occasions when you need to uninstall Teams from your MacBook for reasons such as freeing up disk space or addressing performance issues.
If you’re in a similar situation, this article will guide you through different techniques that you can use to uninstall Teams on Mac without leaving any of its associated files on your system. It does not matter whether you're a tech literate or not, stick with us to find out more!
Part 1: What is Microsoft Teams App?
Before we delve into the uninstallation process, let's understand what Microsoft Teams is all about. Microsoft Teams is a powerful collaboration platform that enables users to communicate, share files, and collaborate effectively. It offers features such as chat, audio and video calls, file sharing, and integration with other Microsoft Office applications. Teams is widely used by businesses and organizations for internal communication, project management, and remote collaboration.
Will Uninstalling Teams Delete My Chat History and Files?
One common concern when uninstalling Teams is whether it will delete your chat history and files. The answer depends on your specific situation. If you have enabled cloud storage and chat history in Teams, your data will be retained even after uninstallation. You can access your chat history and files by logging into Teams from any device or through the Microsoft Teams website. However, if you have chosen to store your data locally, uninstalling Teams may result in the loss of chat history and files.
Part 2: How to Completely Uninstall Teams Including Chat History and Files on Mac Fast?
If you are looking for a fast and efficient way to uninstall Teams on your Mac, Macube is the perfect solution. With Macube Cleaner, you can get access to many incredible features to manage your system's storage efficiently. From app uninstaller for uninstalling unwanted apps to a smart scan for detecting and deleting junks, large files finder for removing large files, and lots more, it provides a comprehensive cleaning solution.
Also, Macube Cleaner can be used to find and delete duplicate files from Mac. And the availability of privacy cleaner makes it a great choice for you to clear browser history on Mac safely and securely.
Key Features
- Smart Scan allows you to scan your Macbook for Teams app junk files and eliminate them efficiently.
- Completely uninstall Teams app and its associated files and attachments from Mac without stress..
- Securely delete sensitive files and folders to ensure they can never be recovered using files shredder.
- Find and remove duplicate Teams files on your Macbook, freeing up valuable disk space.
- It support optimization Tools like similar image finder, extension manager, and lots more to enhance your Macbook's overall performance.
Step 1: Download and install Macube Cleaner on your Mac.
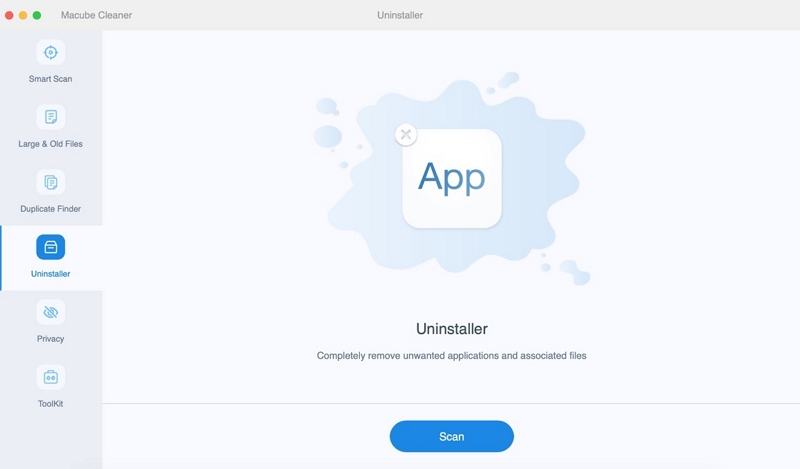
Step 2: Open the installed program and choose the Uninstaller feature at the left-hand side. Then, click the Scan button to start a deep scan.
Step 3: A List of all the apps on your Mac system will be shown on your screen. Preview the results, find “Microsoft Teams”, and select it.
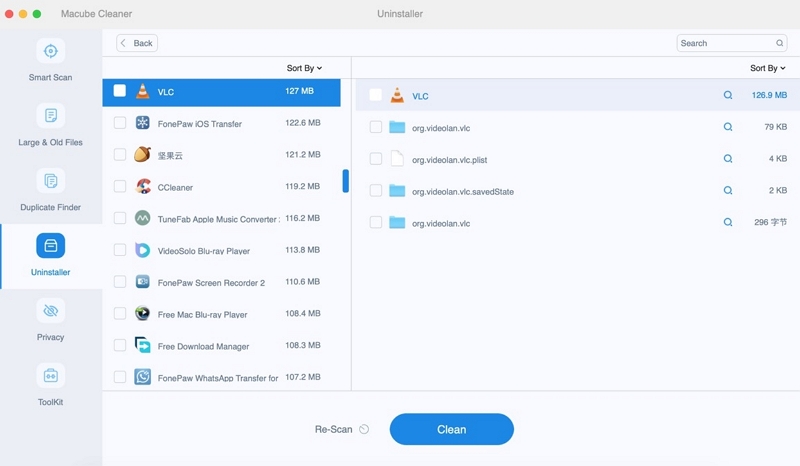
Step 4: Select the relevant Teams-related files and click the Clean button to uninstall Teams app and its associated files from your Mac completely.
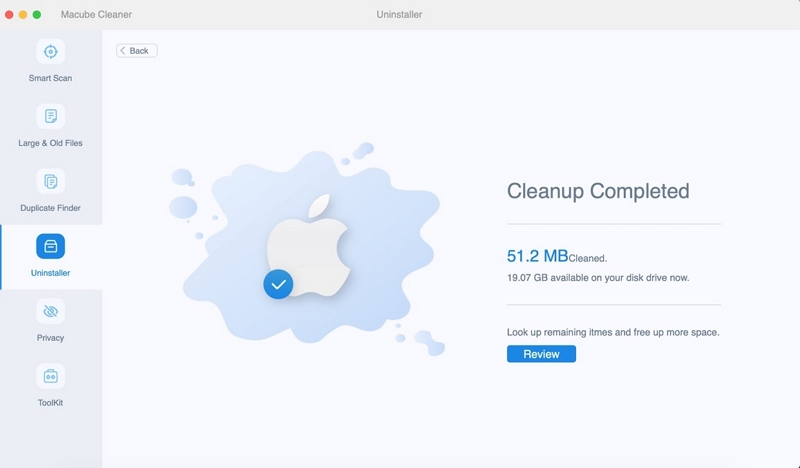
Macube ensures a thorough uninstallation process, leaving no traces of Teams on your Mac. It saves you time and effort compared to manual uninstallation methods.
- If you uninstall Office, Teams will also be removed automatically.
- If you reinstall or conduct an online repair of Office, Teams will be reinstated as part of the installation process.
- Administrators have the option to prevent the installation of Teams when deploying Office. Detailed documentation on this process can be found here.
Part 3: How to Uninstall Teams on Mac Manually?
If you prefer a manual approach to uninstall Teams on your Mac, follow the steps below. But before you get into it, you can evaluate the following advantages and disadvantages of manual offloading to make sure you choose the best option for you.
Pros of Manual Uninstallation:
- No need for third-party applications.
- Complete control over the uninstallation process.
Cons of Manual Uninstallation:
- Time-consuming and tedious.
- May not remove all associated files.
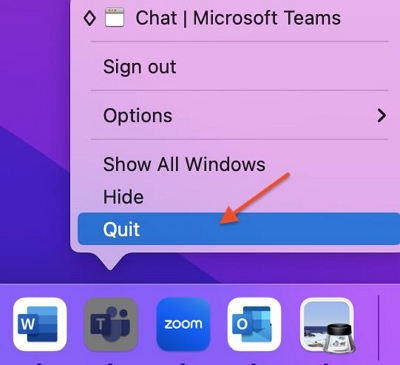
Step 1: Quit Teams. Right-click on the Teams icon in the dock and select "Quit" to close the application.
Step 2: Open Finder. Click on the smiley-faced Finder icon located in the dock.
Step 3: Navigate to Applications. In the Finder window, click on "Applications" in the sidebar.
Step 4: Locate Microsoft Teams. Scroll through the list of applications and find Microsoft Teams.
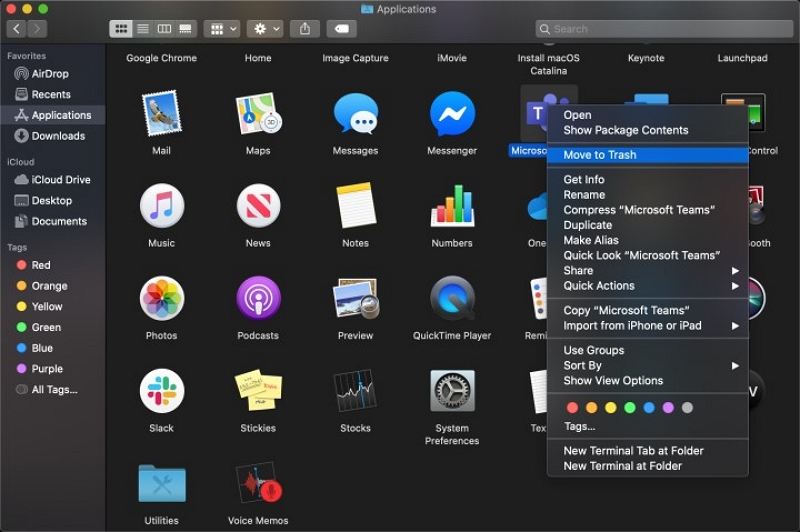
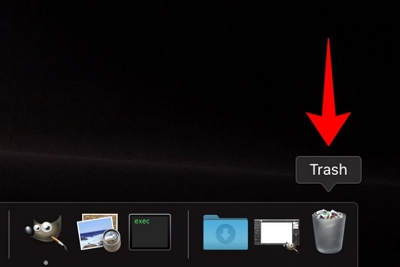
Step 5: Move Teams to Trash. Right-click on the Teams icon and select "Move to Trash" from the options. Then, right-click on the Trash icon in the dock and select "Empty Trash" to permanently delete Teams from your Mac.
While the manual method allows you to uninstall Teams, it may leave behind some residual files. So, follow the procedures below to remove Microsoft Teams leftover files from Mac manually.
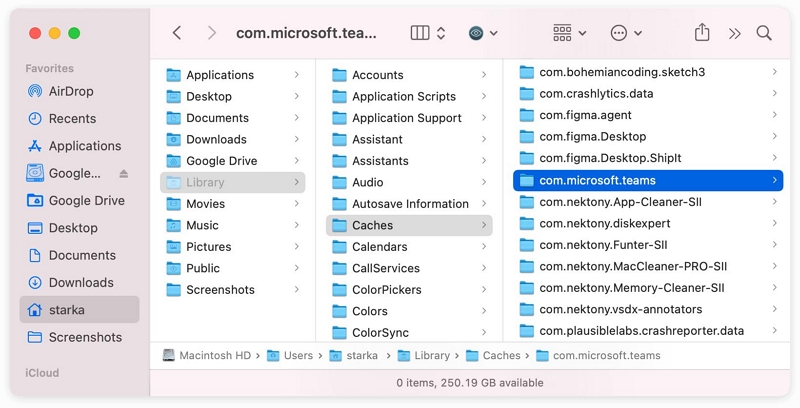
- Open finder and select Go > Go To Folder.
- Open the following directories and delete the folder and files next to each of them;
- ~/Library/Caches/ — com.microsoft.teams
- ~/Library/Application Support/Microsoft/ — Teams
- ~/Library/Preferences/ — com.microsoft.teams.plist
- ~/Library/Saved Application State/ — com.microsoft.teams.savedState
- ~/Library/Logs/ — Microsoft Teams Helper (Renderer)
- /Library/LaunchDaemons/ — com.microsoft.teams.TeamsUpdaterDaemon.plist
- /Library/Preferences/ — com.microsoft.teams.plist
After you complete the above, empty the trash and restart your Mac computer.
Part 4: How to Uninstall Teams on Windows Manually
For Windows users, uninstalling Teams manually is a straightforward process, as outlined below:
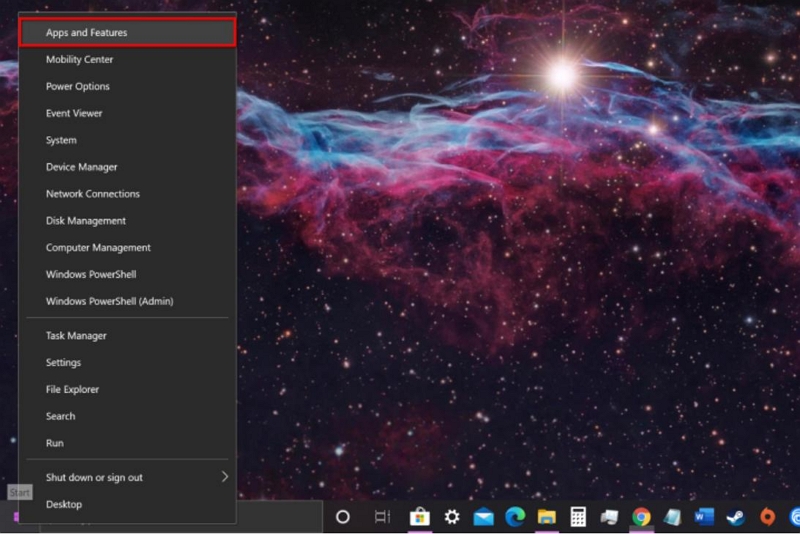
Step 1: Open the Settings menu and navigate to "Apps", then "Apps & features".
Step 2: In the Settings app, locate the Microsoft Teams entry on the right-hand side. You can either scroll down to find it or use the search function.
Step 3: Click on the Microsoft Teams entry, and then select the "Uninstall" button. Confirm the action by clicking "Uninstall" once again.
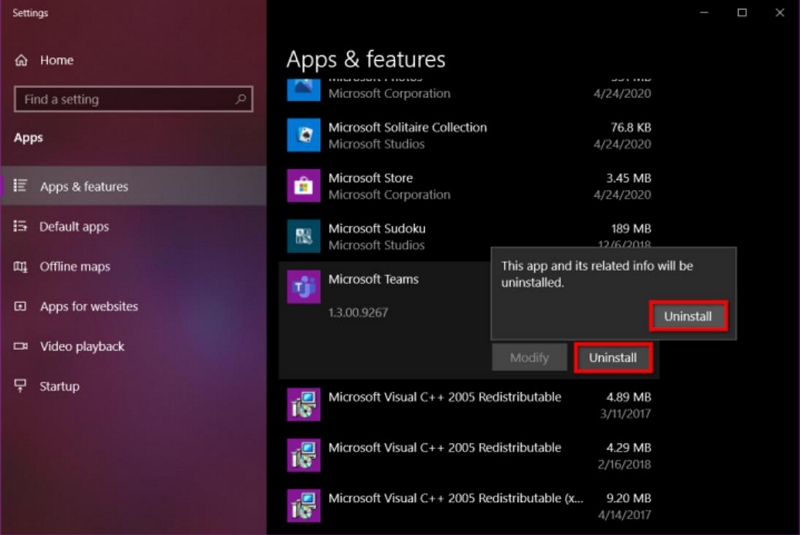
Step 4: A confirmation prompt titled "Do you want to allow this app to make changes to your device?" will appear. Click "Yes" to proceed with the uninstallation process.
Step 5: After uninstalling Teams, you can eliminate any residual Teams files by deleting the following folders:
%appdata%\Microsoft\Teams
%localappdata%\Microsoft\Teams
Step 6: Furthermore, you can remove the following registry keys:
HKEY_CURRENT_USER\Software\Microsoft\Teams
HKEY_LOCAL_MACHINE\Software\Microsoft\Teams
 If you want to delete a registry key:
 - Open the Registry Editor > navigate to the registry key you want to delete > right-click the registry key > choose Delete from the shortcut menu > click "Yes" to confirm the operation.
Part 5: How to Fix Microsoft Teams Keeps Reinstalling?
If you are experiencing the issue of Microsoft Teams reinstalling itself after uninstallation, there are a few steps you can take to fix it.
- Remove Teams from Startup: Open the Task Manager by pressing Ctrl + Shift + Esc. Go to the "Startup" tab and disable Teams from running at startup.
- Clear the Teams Cache: Press the Windows key + R to open the Run dialog box. Type "%appdata%\Microsoft\Teams" and press Enter. Delete all the files and folders within the Teams folder.
- Use Macube Cleaner: If the problem persists, use Macube Cleaner to completely uninstall Teams, ensuring all associated files are removed.
By following these tips, you should be able to resolve the issue of Teams reinstalling itself on your Mac.
FAQs
Q1. How do I remove my Teams account from my Mac?
To remove an account from Windows:
For personal accounts:
1. Click on the Start button, then go to Settings > Accounts > Email & accounts.
2. Select the account you want to remove.
3. Click on Remove and follow the instructions.
For work/school accounts:
1. Click on the Start button, then go to Settings > Accounts > Access work or school.
2. Choose the account you want to remove.
3. Click on Disconnect and follow the instructions.
To remove an account from macOS:
1. Open Finder, then go to Applications > Utilities > Keychain Access.
2. Right-click on the account you want to remove and select Delete [account name].
To remove an account from a web browser:
1. In the web browser, click on your profile picture at the top right.
2. Choose Sign out. If you have multiple accounts signed in, ensure to select the specific account you want to sign out of.
Q2. Are there any leftover files or preferences I need to delete after uninstalling Teams on Mac manually?
Leftover Files:
Application Support Folder: Open Finder and navigate to ~/Library/Application Support. Look for a folder named "Microsoft Teams" and delete it. This folder contains various Teams-related files, including logs, cache, and temporary data.
Preferences Folder: Go to ~/Library/Preferences. Find and delete the file named "com.microsoft.teams.plist." This file stores Teams' preferences and settings.
Caches Folder: Navigate to ~/Library/Caches. Locate the folder named "com.microsoft.teams" and delete it. This folder contains additional Teams-related caches and data.
Leftover Preferences:
LaunchAgents: Open ~/Library/LaunchAgents. Look for a file named "com.microsoft.teams.plist" and delete it. This file controls Teams' automatic startup.
LaunchDaemons: Go to ~/Library/LaunchDaemons. Find and delete the file named "com.microsoft.teams.plist." This file is responsible for background processes related to Teams.
By removing these leftover files and preferences, you can ensure that all traces of Microsoft Teams are removed from your Mac, leaving your system clean and free of any remnants of the application.
Conclusion
Uninstalling Microsoft Teams on your Mac is a straightforward process when you have the right tools and knowledge. Whether you choose the fast and efficient automated solution with Macube Cleaner or prefer the manual approach, it's important you follow the steps correctly to ensure complete u installation of the Teams app and its files.
Hot Articles
Macube Cleaner
Speed up and troubleshoot your Mac super easily with a Macube full-featured free trial!
Start Free Trial