Summary: This post is about how to clear unwanted autofill entries in Google Chrome, Safari and Firefox. The unwanted information in autofill can be annoying or even anti-secretive in some cases, so it’s time to clear autofill on your Mac.
See also: Why is Autofill Not Working on My Chrome?
Now all browsers (Chrome, Safari, Firefox, etc.) have an autocomplete feature, which can fill out online forms(address, credit card, password, etc.), and log-in information (email address, password) automatically for you. It helps to save your time, however, it is not safe to let browsers remember important information like a credit card, address, and email address. This post is going to walk you through the steps to delete autofill in Chrome, Safari & Firefox on Mac. And if you want, you can completely turn off autofill in Chrome, Safari, and Firefox.
Part 1: Easiest Way to Delete Autofill from Chrome/Safari/Firefox on Mac
You can open each browser on Mac. Then delete autofill entries and saved passwords one by one. Or you can use a more simple way - Macube Cleaner to remove autofill in all browsers in one click. Macube Cleaner can also clear other browsing data, including cookies, search history, download history and more. Please follow the below steps to delete all autofill entries and saved text on Mac:
Step 1: Download Macube Cleaner on iMac, MacBook Pro/Air.
Step 2: Run the program and click Privacy > Scan to search out browsing history in Chrome, Safari, Firefox, on Mac.
Step 3: Select Chrome > tick Login History and Autofill History. Click Clean to remove autofill in Chrome.
Step 4: Choose Safari, Firefox or another browser and repeat the above step to delete autofill in Safari, Firefox and more.
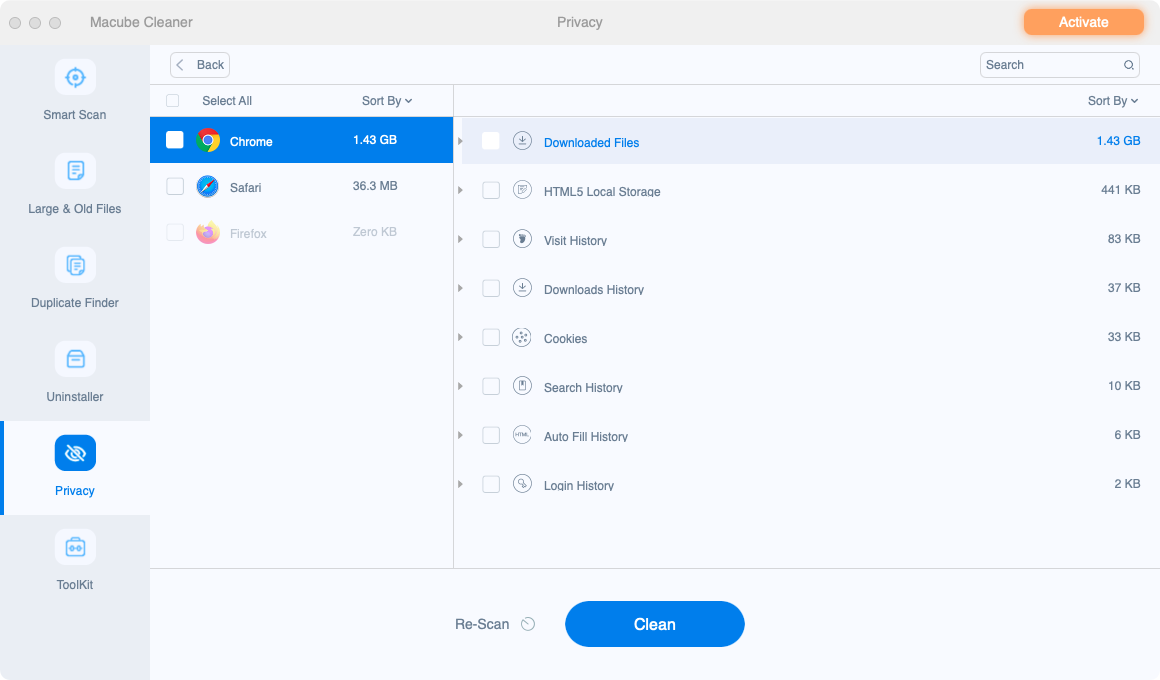
Tip: If you want to remove a specific autofill entry, for example, delete Facebook login history or the email address from Gmail, click the gray triangle icon to view all login history. Check the item you want to remove and click Clean.
Part 2: Clear AutoFill in Chrome on Mac Manually
Follow the below steps to remove autocomplete history in Chrome.
Step 1: Open Chrome on Mac.
Step 2: Launch Chrome. Click the 3-dot button in the top-right corner and choose History > Show Full History.
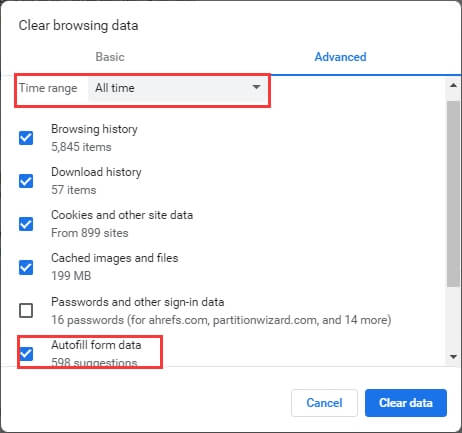
Step 3: Click Clear Browsing Data… in the left pane. In the pop-out, switch to the Advanced tab and check "Passwords and other sign-in data" as well as "Autofill form data".
Step 4: Click Clear data.
But if you want to delete specific autofill entries in Chrome, you can refer to the below steps:
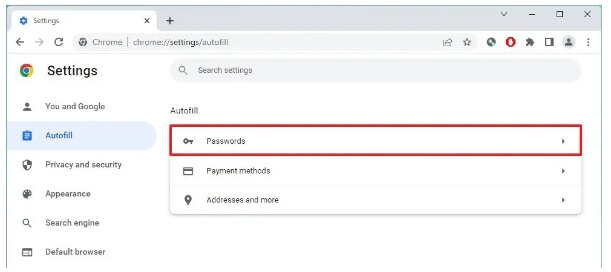
Step 1: Click the three dots icon on the top right corner of Chrome and choose Settings.
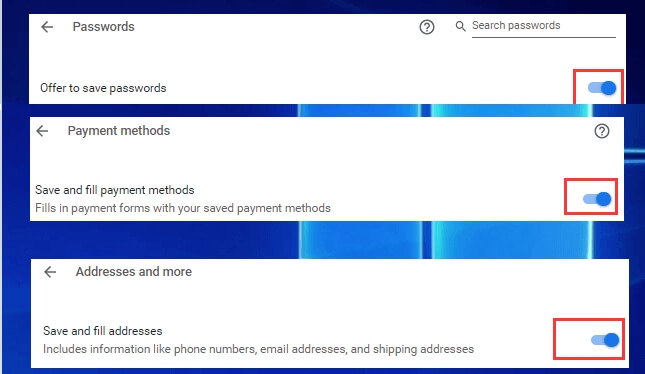
Step 2: Select Autofill and choose the type of autofill you want to remove, including Passwords, Payment methods or Addresses and more.
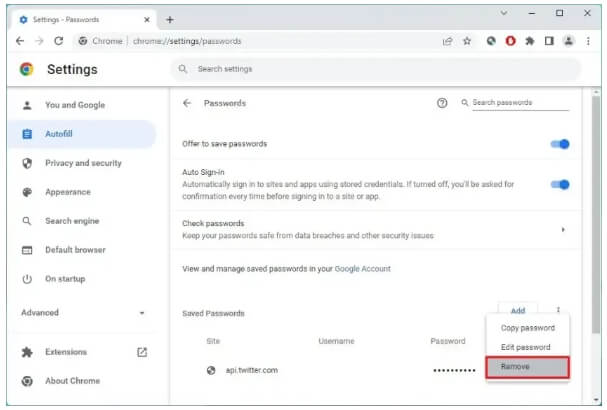
For example, to clear an autofill password, you can click Passwords first and then locate Saved Passwords to see all of the saved passwords from different sites. Click on the three dots icon next to the specific password and choose Remove to delete it.
Tip: To turn off autofill in Chrome on Mac, click the three dots icon on the top right corner to open a drop-down list. Hit Settings > Autofill. Choose the specific types of information you don't want Chrome to autofill. After selecting the type of autofill, just toggle off the switch of the chosen autofill, Offer to save passwords for autofill passwords, Save and fill payment methods for autofill payment and Save and fill addresses for autofill address.
Part 3: Manually Delete Autofill in Safari on Mac
Safari also allows you to delete autofill and save usernames and passwords.
Step 1: Open Safari.
Step 2: Click Safari > Preferences.
Step 3: In the Preferences windows, choose Autofill.
- Navigate to User names and passwords, click Edit and remove saved user names and passwords in Safari.
- Next to Credit cards, click Edit and remove credit card information.
- Click Edit for Other forms and delete all autofill entries.
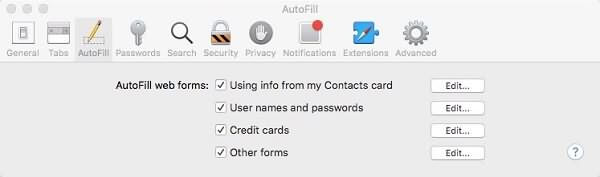
Tip: If you don't need Autofill anymore, you can disable autofill in Safari by unchecking Using info from my Contacts Card + Other Forms on Safari > Preference > Autofill.
Part 4: Manual Way to Clear Autofill in Firefox on Mac
Clearing autofill in Firefox is very similar to that in Chrome and Safari.
Step 1: In Firefox, click three lines at the top right of the screen > History > Clear recent history.
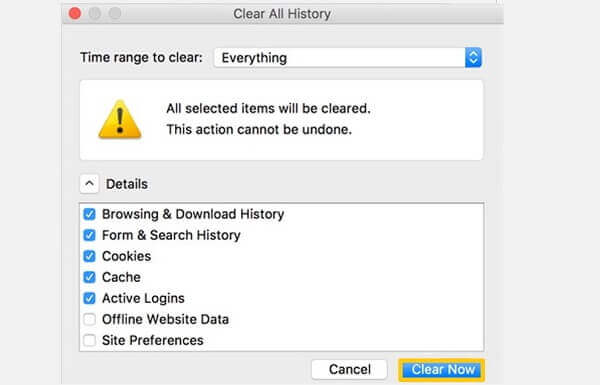
Step 2: Set Time Range to Clear Everything.
Step 3: Check Form & Search History and click OK.
Tip: To disable autocomplete in Firefox, click the three lines icon in the upper-right corner and choose Settings. Select Privacy & Security in the left menu and locate the History section, click Firefox will and choose Use custom settings for history. Then, uncheck Remember search and form history.

Part 5. How to Delete Specific Chrome Autofill Suggestions on Mac
Sometimes, you may want to delete autofill suggestions from the form box of a website. Different from removing autofill suggestions from the searching box of Chrome, there isn't a Delete option next to the suggestion you want to delete. To clear this type of autofill suggestion, here is how.
Step 1: Go to the website where its form box saves the unwanted autofill suggestions.
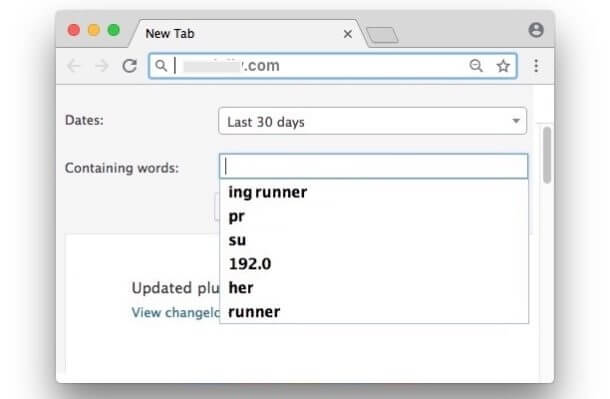
Step 2: Type the suggestion in the form box and then highlight it with the down arrow key on your keyboard.
Step 3: Press Shift + FN + Delete to remove the autofill data.
Part 6. How to Fix "Chrome Autofill Won't Delete" on Mac
Some users reflect that they fail to delete autofill with Shift + FN + Delete on Mac. They want to get rid of unneeded autofill data from the list of the form box with the shortcuts but nothing changes. If you are also stuck with such trouble, here are 4 effective fixes for you.
1. Clear Autofill in Chrome on your Mac by following Part 1 (automatic way) or Part 2 (manual method).
2. Update Chrome and here is the official guide from Google.
3. Check your extensions. You can click the 3-dot icon in the top-right corner of the Chrome page and select More tools > Extensions. Turn off each extension and check if it is the cause of the issue. If there is one, just disable or even uninstall it.
4. Reinstall Chrome. Before uninstalling your Chrome, please don't forget to back up the saved data on your Chrome like passwords, bookmarks, etc.
Conclusion
That's it! You can try the methods above to delete autofill in Chrome, Safari, and Firefox on Mac. If you want an easy and fast way to clear autofill on Mac, then give Macube a shot. When Chrome autofill won't delete, the related fixes in this post must be useful. Hope they help!
Macube Cleaner
Speed up and troubleshoot your Mac super easily with a Macube full-featured free trial!
Start Free Trial