Whether you are surfing the internet using a friend’s device or not, the private browsing mode on Safari will save you the stress of wiping your browsing data, such as search history, cookies, and caches, all of which slows down browsing speed and also exposes your online privacy. The private browsing mode lets you navigate the internet with minimal tracking.
However, mind you, for you to use this browsing mode, you have to activate it from your Safari browser, since it's not the default browsing mode. There are several ways to go about this depending on the Apple device you are using. We will discuss this here in this post as we look at how to browse privately on Safari. Keep reading.
What Is Private Browsing?
Private browsing is a feature tucked into many browsers, such as Google Chrome, Safari, Firefox, and more, to protect your online privacy. The feature is designed to help you conceal your browsing data so that whatever browser you are using doesn't have anything about your browsing session. It offers a great way to minimize tracking.
Why should you use private browsing in Safari Mac?
Private browsing mode comes in handy when you want to surf the internet using Safari on Mac for the following reasons:
- Privacy Protection
When you activate the private browsing mode on your Safari browser, your browsing data is hidden. No one can track or know which website you visited. Also, your browsing preference is completely safe, since cookies and cached are completely disabled I'm private browsing.
- Improved Browsing Speed
Private browsing improves your browsing speed, thereby enhancing your browsing experience. You might be wondering how possible. Well, browsing search history, caches, and cookies take up little browsing storage which slows down the operations of a web browser.
Part 1. How to Activate Private Browsing in Safari on Mac
Having discussed the importance/reasons for using private browsing, let's explore how to activate the feature in Safari Mac. Check out the detailed guide down here to get this done:
How to start a private browsing session in Safari
Step 1: Go to the bottom of your Mac home screen and click on the Safari icon in the dock panel to launch the corresponding browser screen.
Step 2: At the upper left corner of the page that appears, locate the File button, and click on it. You should get a flyout menu without several options in response to your click. Select New Private Window to proceed.
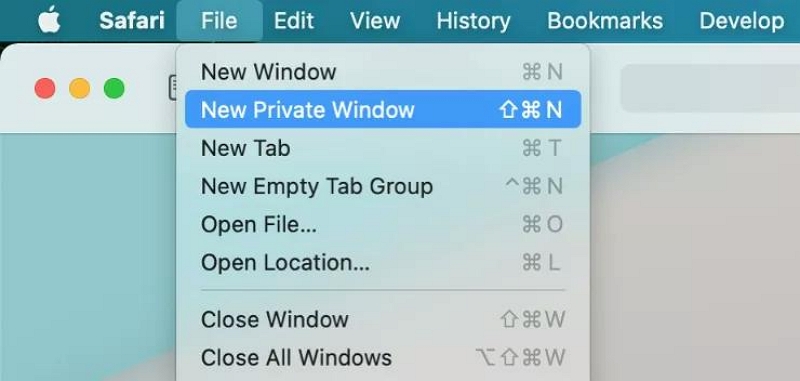
Alternatively, you can hold down Shift + Command + N on your keyboard to open a private browsing screen.
Step 3: The next screen that appears is the private browsing page. You will notice a dark Smart Search field on the page just as seen below:

This signifies that you are using incognito or private browsing mode on Safari.
How to open a private tab in Safari
If you are looking to browse multiple private browsing screens, you may have to launch several tabs to ease and hasten your activity. A simple way to do this on your Safari browser is given below:
Step 1: Once you get on the private browsing screen, locate and click on the + icon in the toolbar section. Alternatively, you can press down Command + T.
Step 2: Once done, a new private browsing tab will open. Use the step 1 procedure as many times as you like to launch as many private tabs as you like.
 Quick Note:
- If you are just opening Safari and you haven't activated the private browsing mode, all screens that open when you use the Command + T (or click the + icon in the toolbar section) buttons are in normal browsing mode. Your data will be recorded in this mode.
Steps to always browse privately in Safari
For folks that want to go incognito or private browsing mode permanently, use this instructional guide to achieve this:
Step 1: Run the Safari browser on your Mac computer by clicking on the corresponding button in the dock panel.
Step 2: Next, click on the Safari button at the topmost left corner of the browser page and select Settings from the options. If you don't want to use this approach, you can hold down the Command + , buttons to open the Preference window. Here's what the Preference window looks like:
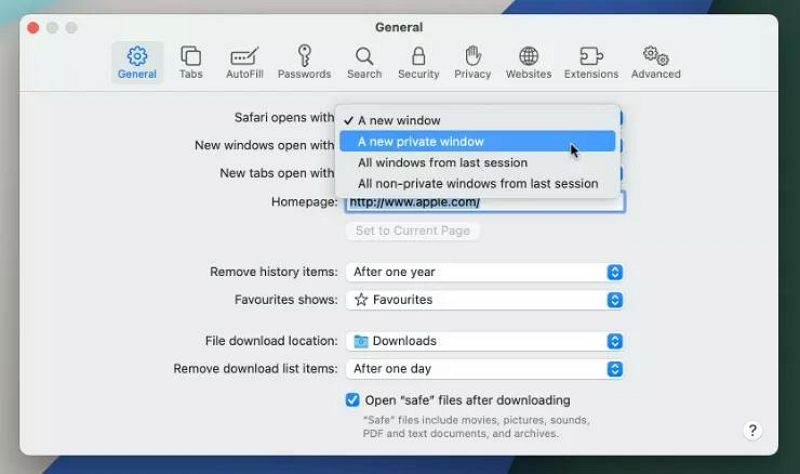
Step 2: Click on the General tab, then head to where you have Safari opens with and click the drop-down menu beside it. Select A new private window.
Step 3: Close the window and start using the Safari private browsing mode to surf the internet anytime any day.
Part 2. How to Deactivate Private Browsing Mode in Safari Mac?
No longer interested in the private browsing mode in Safari Mac? You can deactivate private browsing easily and quickly using the steps down here:
Step 1: Close the current private browsing page by tapping the Red icon situated at the upper left corner of the Safari page, or use the Command + W to get the same result.
Step 2: Next, launch the Safari browser again and head to where you have the File icon. Click on the corresponding button, then choose New Window to use the regular window for your internet activities.
Quick Note:
- The guide above works best when you haven't configured Safari to browse privately permanently. However, if you’ve done that, kindly follow these instructions down here:
- 1. Run Safari and click on the Safari button at the top left corner of the page that comes up.
- 2. Click Settings and navigate to the General tab.
- 3. Now select A new window from the flyout menu beside Safari opens with.
Part 3. Clear Safari Private Browsing History in One-Click- Macube Cleaner
Safari private browsing isn’t completely safe to use, as the browser still reveals some crucial info about you. The Safari private mode stores your IP address, plus download history in its database. If you want to be completely anonymous (safe), you need to install a privacy protection tool that offers top-notch services.
There are several tools you can count on, but we recommend the Macube Cleaner- a multipurpose software program dedicated to offering five star privacy protection services to end-users. This software protects online privacy by simply clearing your browsing data on web browsers such as Safari, Chrome and Firefox.
Macube Cleaner powers one of the best cleaning algorithms that clears your entire Mac to optimize its operations within the shortest time frame. With the simplified interface layout and impressive features tucked into this software, Mac users can quickly create over 500+ GB of memory space with just a few clicks.
Key Features
- 1-click to clear your Safari private and regular browsing mode without compromising users’ data.
- The fastest Mac cleanup suite with a fast speed to scan and delete unwanted files or data.
- Simplified user interface with easy-to-grasp features you can count on to help you clean up your Mac and optimize the operations.
- Supports over 5+ cleaning modes, such as duplicate finder, uninstaller, large and old files cleaner, file shredder, and many more.
- Macube Cleaner is highly secured, so it's safe to use.
Steps to Clear Safari Private Browsing History
With the simple guide below, you can clear your private browsing history in the Safari browser on your Mac using Macube Cleaner:
Step 1: Download and install Macube on your Mac computer. Load the software, and click on the Privacy icon on the left sidebar. (I revised it)
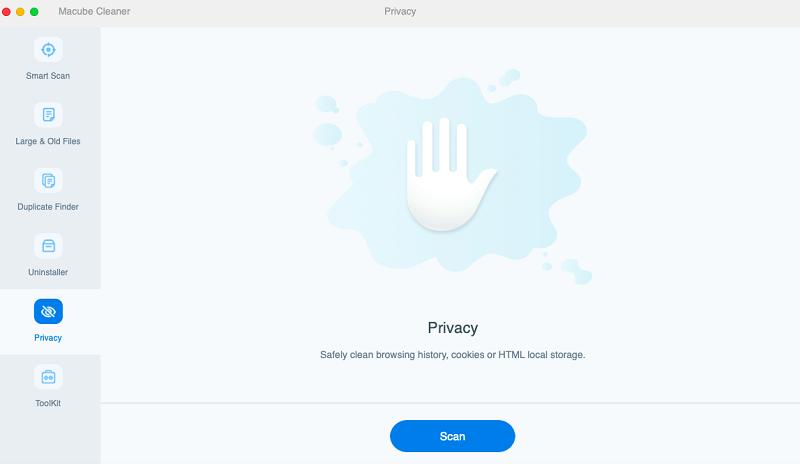
Once done, tap the blue Scan button to proceed.
Step 2: Next, the Macube Cleaner will run a quick check on your Mac computer, scanning the Safari, Chrome, and Firefox browsers. When the scanning is over, the software will display the browsing data for each web browser on the left sidebar, just as seen below:
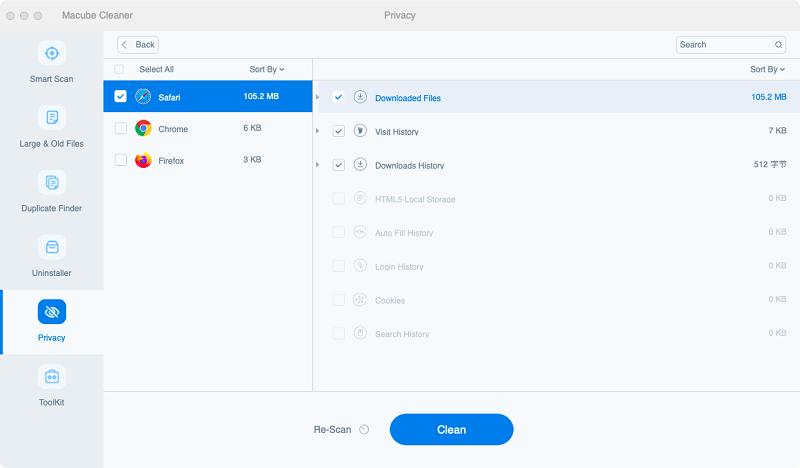
Step 3: Select the Safari browser, and the corresponding browsing data, including search history, downloads, cookies, and caches, will come up on the right hand panel. Select the browsing history to delete by ticking the box beside the URL link.
Once this is finished, click Clean and Macube Cleaner will proceed to clear your private browsing history.
Part 4. How to Enable Private Browsing in Safari on iPhone/iPad
If you don't own a Mac computer but have another Apple device like iPhone or iPad, you can also activate the private browsing mode on Safari. The procedure to follow is super easy, and quick.
Once you enable private browsing on Safari, your browsing data is safe and Apple can't track your web activity. Also, no data from your private browsing session will sync to Cloud. This means none of your iCloud-connected devices would have your browsing history.
Choose any of the guides that correspond with your iDevice to enable private browsing on it:
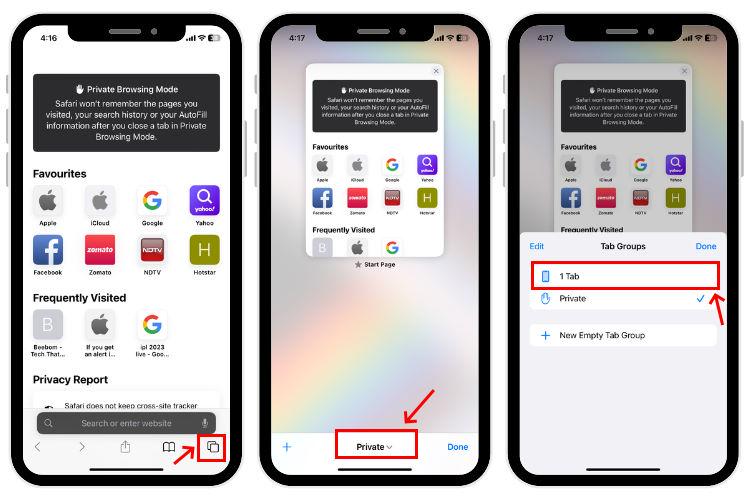
iPhone
- Click on the Safari browser button on your Home Screen and the page shown below will pop up:
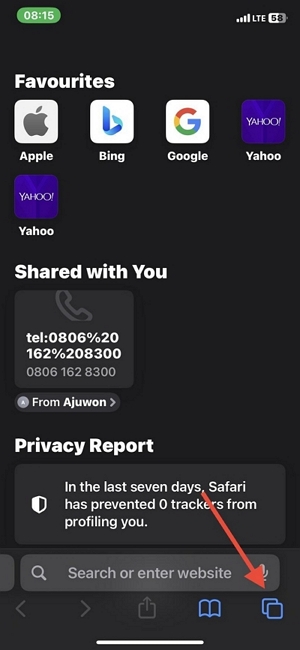
- Next, click the Tabs button located at the bottom right corner of the page. Once done, this page will be displayed on your iPhone screen:
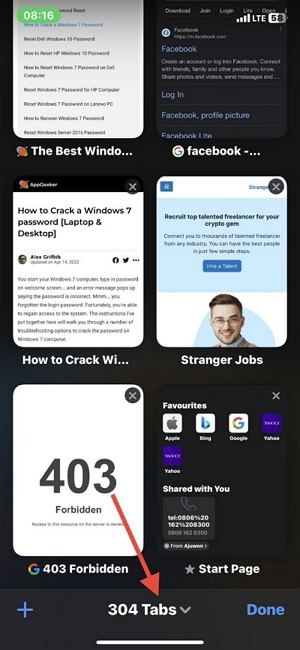
- Click on the [Number] Tabs to launch the window labeled Tab Groups, just as seen below:
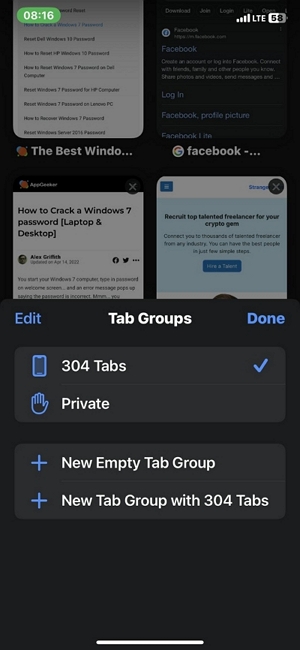
- Now click Private and select Done to activate private browsing mode on your Safari browser.
Alternatively,
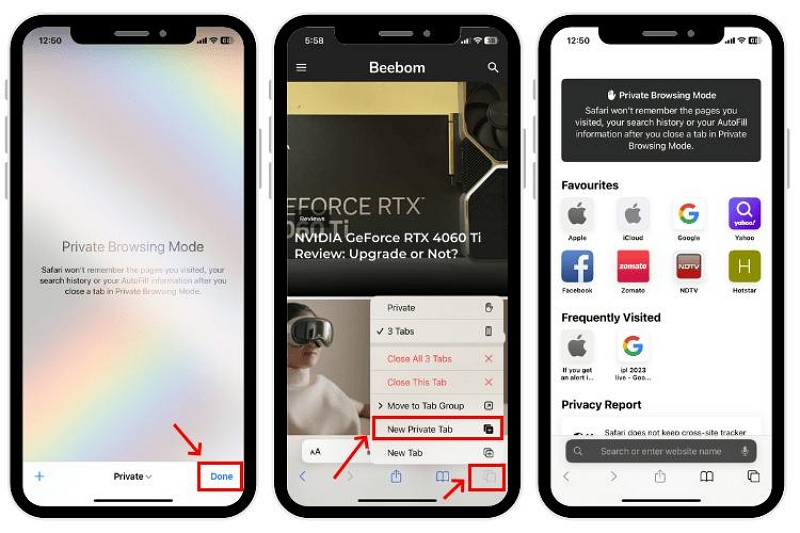
- You can just hold down the Tabs button at the bottom right corner of your Safari browser page.
- Select Private or New Private Tab and the private browser window will come up.
- Mind you, the private browsing window will display a black or dark search field instead of white.
iPad
- On your iPad Home Screen, find the Safari browser icon and click on it.
- Next, hold down the Tabs button, which is situated in the top right corner of the Safari browser page.

- Choose New Private Tab to switch from regular mode to private browsing mode.
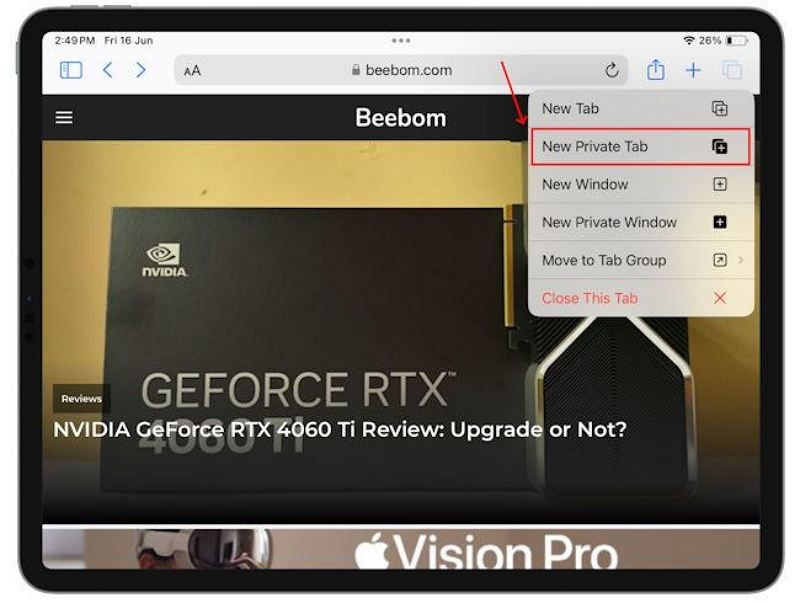
- Once done, the search field will turn black as opposed to the white color shown when you are using the regular mode.
Part 5. How to Remove Private Browsing Mode in Safari on iPhone/iPad
You can always exit the private browsing mode in Safari on your iPhone or iPad. Here's how to do this for the different iDevices:
iPhone
- While you are on the Safari browser page, click on the Tabs button.
- Next, hit the Private drop-down menu at the center of the page to access Tab Groups.
- Now click on the [Numbers] Tab to activate regular browsing mode.
iPad
- On the Safari browser page, locate the Tabs button at the top right corner. Click the button to proceed.
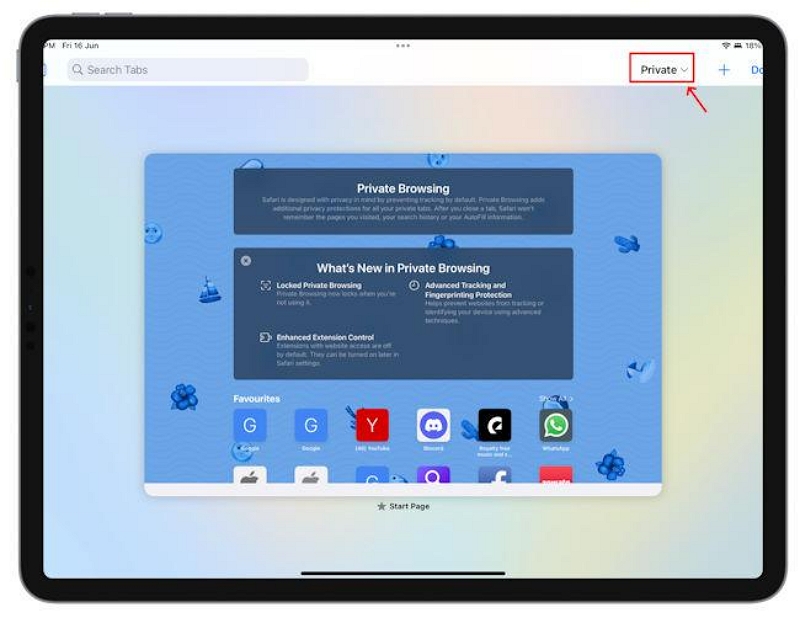
- Next, hit the Private drop-down icon and you get the response window down here:
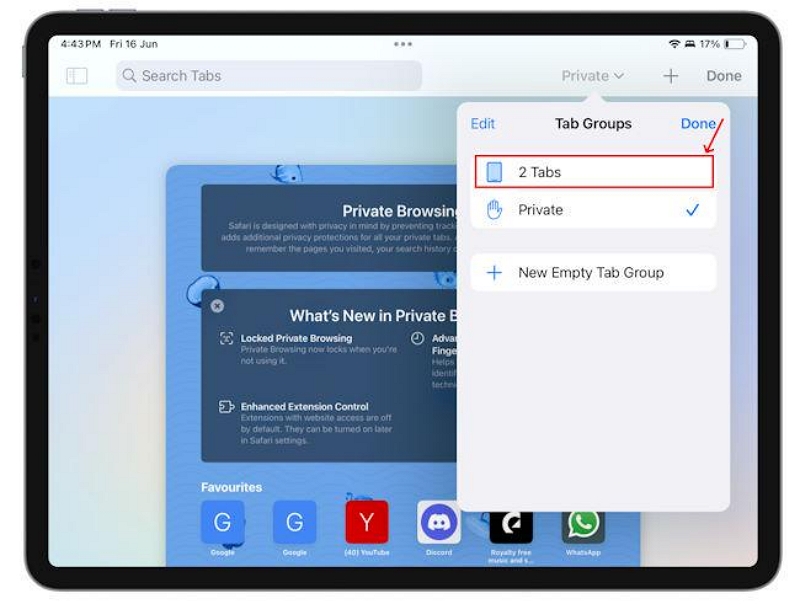
- Now choose the [Number] Tabs and Safari will exit private browsing mode immediately.
Conclusion
Private browsing on Safari a secure way to protect your online privacy while surfing the internet on any Apple device, whether iPhone, iPad or even the Mac computer system. When you activate the function, your browsing data remain hidden. However, mind you, this function doesn’t keep you anonymous completely.
For instance, downloaded files are trackable, as Safari private browsing doesn’t hide them. Also, your IP can be tracked while using the Safari private mode. If you want to remain anonymous, then you need to install the Macube Cleaner to come to your rescue. The software helps you clear your entire browsing session, both in regular and private browsing mode. You should try the software out today!
Macube Cleaner
Speed up and troubleshoot your Mac super easily with a Macube full-featured free trial!
Start Free Trial