If you're looking to personalize the content you come across while browsing various websites, enabling third-party cookies is the way to go. Although third-party cookies have been at the center of privacy concerns, they can also help you enhance your browsing experience.
In this comprehensive guide, we will explore the ins and outs of third-party cookies, their advantages and disadvantages, and provide step-by-step instructions on how to enable them in popular browsers on both Mac and Windows devices.
Part 1: All You Need To Know About Third-Party Cookies
Firstly, let’s understand what third-party cookies are, how they work, and the effects of enabling them.
What Are Third-Party Cookies?
Third-party cookies are small text files that websites place on users' devices through their web browsers.
Unlike first-party cookies, which are set by the website you are directly visiting, third-party cookies are created by domains other than the one you are currently browsing. These cookies enable advertisers, analytics companies, and other third-party services to track your online activity and gather information about your browsing habits.
How Does Third Party Cookies Work?
When you visit a website that contains third-party content, such as advertisements or social media widgets, those third-party domains can set cookies on your device. These cookies record information about your interactions with the site and other websites you visit. So, any time you navigate to another site that uses the same third-party services, the cookies can be accessed to provide personalized content or targeted advertisements.
Effect Of Enabling Third-Party Cookies: Advantages & Disadvantages Of Third-party Cookies
Enabling third-party cookies comes with a set of advantages and disadvantages. Understanding these can help you make an informed decision about whether to enable or disable them.
Advantages of Third-Party Cookies:
- Personalized Content: Third-party cookies enable websites to provide personalized content based on your browsing history and preferences.
- Enhanced User Experience: By remembering your login information, preferences, and settings, third-party cookies can enhance your overall browsing experience.
- Targeted Advertising: Advertisers use third-party cookies to deliver targeted advertisements based on your interests and browsing behavior.
Disadvantages of Third-Party Cookies:
- Privacy Concerns: Third-party cookies can track your online activity, raising concerns about privacy and data security.
- Intrusive Advertising: Some users find targeted advertising intrusive and prefer not to have their browsing habits monitored.
- Security Risks: Malicious actors can exploit third-party cookies for unauthorized access or data breaches.
Part 2: How to Enable Third-Party Cookies on Mac
Now that you have a better understanding of third-party cookies, let's explore how to enable them on Mac devices in popular browsers like Chrome and Safari.
Method 1: Enable Third-Party Cookies for Safari on Mac
Safari, the default browser on Mac, also allows you to enable third-party cookies. Follow these steps to enable third-party cookies in Safari:
Step 1: Launch Safari on your Mac.
Step 2: Click on "Safari" in the top left side of the menu bar.
Step 3: Select "Preferences" from the dropdown menu.

Step 4: Click on the "Privacy" tab in the pop-up window that appears. Then, uncheck the "Block all cookies" option to enable third-party cookies.
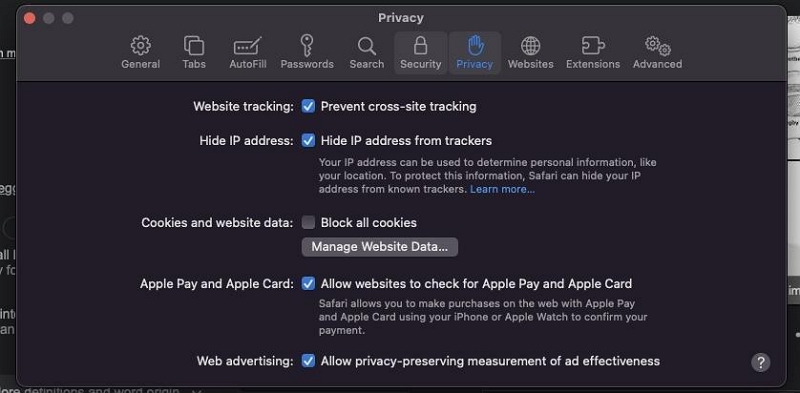
Step 5: You can also enable the "Prevent cross-site tracking" option for additional privacy measures.
Method 2: Enable Third-Party Cookies in Chrome on Mac
Google Chrome is one of the most popular browsers, and enabling third-party cookies is a simple process. Follow these steps:
Step 1: Launch Google Chrome on your Mac.
Step 2: Click on the three-dot menu icon in the top-right corner of the browser window.
Step 3: Select "Settings" from the dropdown menu.
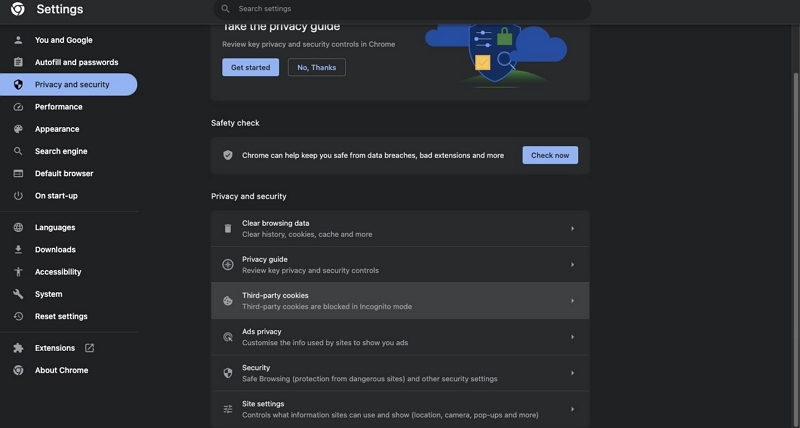
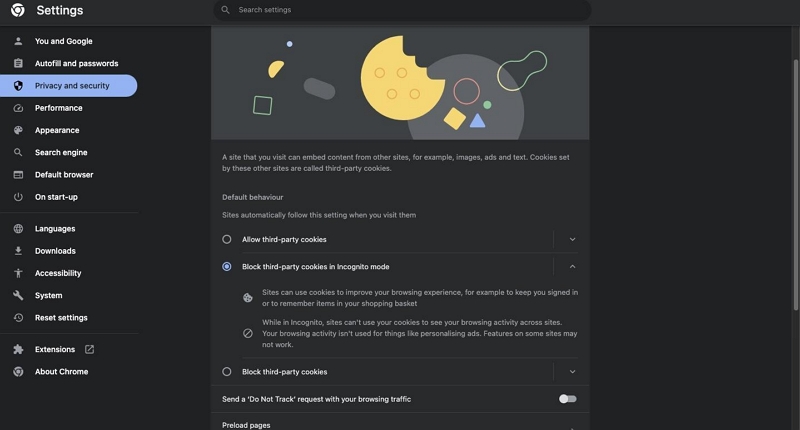
Step 4: Click on "Privacy and security" in the left sidebar.

Step 5: Click on "Cookies and other site data."
Step 6: Choose the "Third-party Cookies" option. Then, select “Allow third-party cookies”.

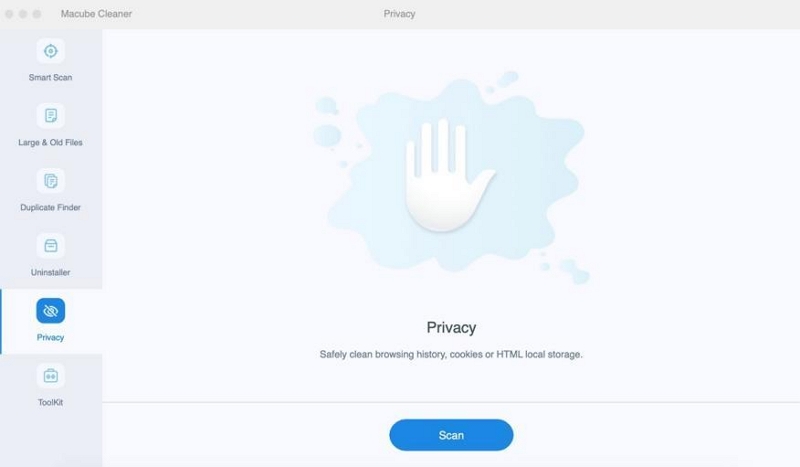
Helpful Tip: Smartest Way To Clear Cookies On Mac
When you enable third-party cookies, don't forget to clear your cookie regularly to protect your privacy. We recommend Macube Cleaner, which can clean your cookie very well.
Macube Cleaner is a powerhouse that enables users with any experience level to effectively clean cookies and optimize Mac performance. It uses modern technology to deeply scan Mac for browser cookies, caches, downloads, and lots more, then completely delete them and make them unrecoverable.
Key Features:
- Smart Scan and Privacy Protector tools facilitate efficient cleaning of junk, caches, cookies, and other browser history on Mac.
- Allows complete uninstallation of apps and their leftovers from Mac.
- Free up Mac storage by clearing large and old files using an advanced “Large & Old Files Finder”.
- Supports more helpful functions like files shredder, extension manager, and similar image finder.
Step-by-step Guide to Clear Cookies with Macube Cleaner:
Step 1: Firstly, install Macube Cleaner software on your Mac..
Step 2: Start installed app and select “Privacy” from the left side of the page. Then, click on the “Scan” button next.
Step 3: Macube Cleaner will perform a deep scan on all available browsers installed on your Mac to find cache files, cookies, history, and lots more.
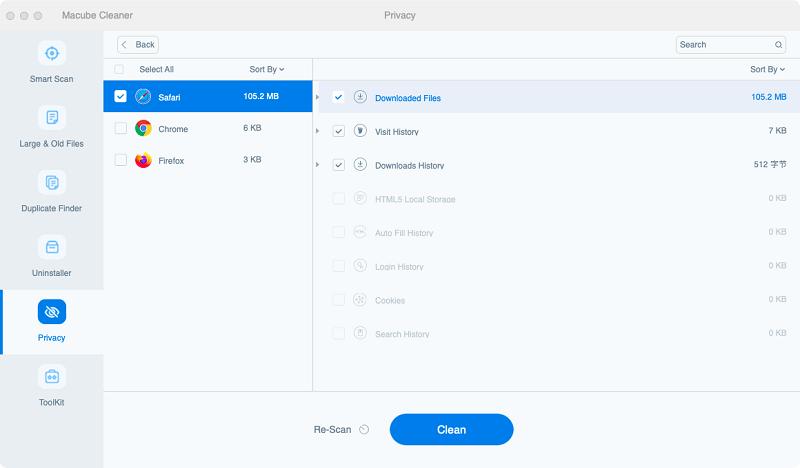
Step 4: Once the scanning process is complete, choose the browsers you intend to clear cookies from. Then, check the relevant checkboxes and click “Clean” to completely clear cookies from the Mac.

Part 3: How to Enable Third-Party Cookies on Windows
If you're using a Windows device, worry less, we got you covered. Enabling third-party cookies on popular Windows browsers like Chrome, Firefox, Internet Explorer, and Microsoft Edge is as straightforward as taking a walk in the park. Read on to find out how to operate.
Method 1: Enable Third-Party Cookies in Chrome
The procedure to enable third-party cookies on Google Chrome on Windows is similar to using Mac. You just need to do the following;
Step 1: Launch Google Chrome on your Windows device.
Step 2: Click on the three-dot menu icon in the top-right corner of the browser window and select “Settings" from the dropdown menu.
Step 3: Select on "Privacy and security" in the left pane and click on "Cookies and other site data."
Step 4: Finally, select the "Allow all cookies" option to enable third-party cookies.
Method 2: Enable Third-Party Cookies in Firefox
Firefox offers a range of privacy options, including enabling third-party cookies. Here is how to enable third-party cookies on this browser;
Step 1: Open Mozilla Firefox on your Windows computer and click on the three-line menu icon in the top-right corner of the browser window.
Step 2: Select "Settings".
Step 3: Click on "Privacy & Security" in the left sidebar.
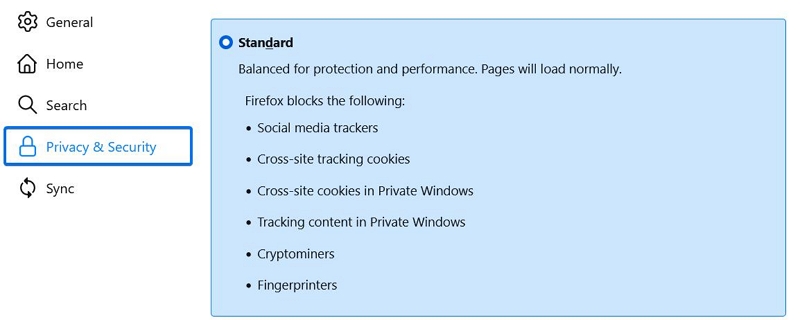
Step 4: Choose the "Standard" protection option or customize your settings with the "Custom" configuration.
Method 3: Enable Third-Party Cookies in Internet Explorer
Internet Explorer, although less commonly used, still offers the option to enable third-party cookies. Here is how to execute the operation;
Step 1: Launch Internet Explorer on your Windows device.
Step 2: Click on the gear icon in the top-right corner of the browser window. Select "Internet Options" from the dropdown menu.

Step 3: Click on the "Privacy" tab and click the "Advanced" button.
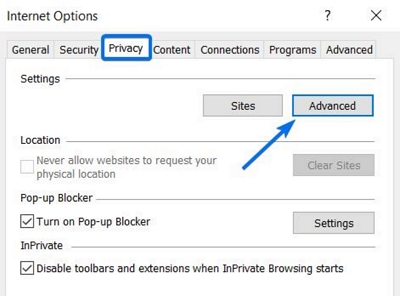
Step 4: Navigate to the “Third-Party Cookies” section and select "Accept".

Method 4: Enable Third-Party Cookies in Microsoft Edge
Microsoft Edge, the newer browser from Microsoft, also supports third-party cookies. Follow these steps to enable it:
Step 1: Launch Microsoft Edge on your Windows device.
Step 2: Click on the three-dot menu icon in the top-right corner of the browser window and select "Settings" from the dropdown menu.
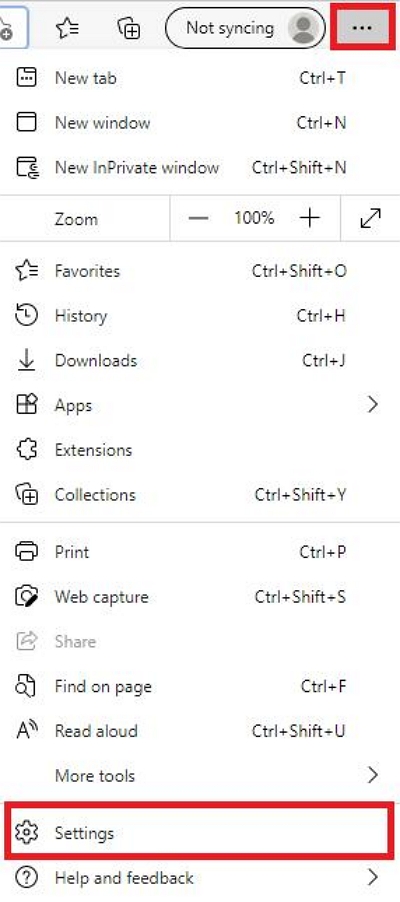
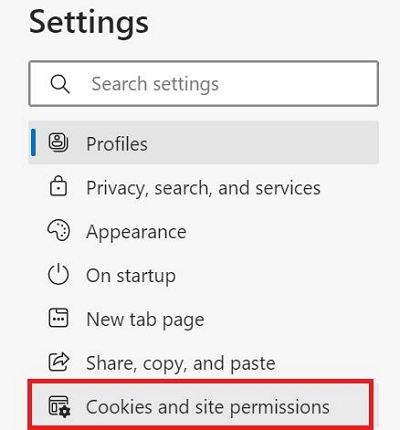
Step 3: Scroll down and select "Cookies and site Permissions."
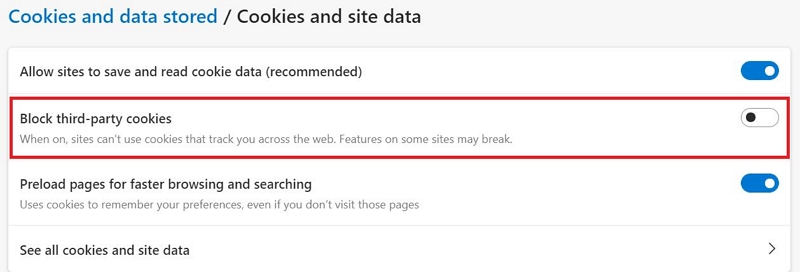
Step 4: Next, click on “Manage and Delete Cookies and Site Data”. Then, click on the toggle next to “Block Third-party Cookies” to disable it.
Method 5: Enable Third-Party Cookies in Safari
If you're using Safari on a Windows device, you can also enable third-party cookies by using the steps outlined below;
Step 1: Open “Safari” browser on your Windows computer.
Step 2: Click on the gear icon in the top-right corner of the browser window. Then, select "Preferences" from the dropdown menu.
Step 3: Click on the "Privacy" tab.

Step 4: Uncheck the "Block all cookies" option to enable third-party cookies.
Conclusion
Enabling third-party cookies can enhance your browsing experience by providing personalized content and targeted advertising. However, weighing the advantages against the potential privacy risks is crucial.
By following the step-by-step instructions provided in this guide, you can easily enable third-party cookies in popular browsers on both Mac and Windows devices. However, always remember to review and clean your cookie settings periodically to ensure they align with your privacy preferences protect your privacy.
Macube Cleaner
Speed up and troubleshoot your Mac super easily with a Macube full-featured free trial!
Start Free Trial