If you check the storage of your Mac drive, you might find that photos occupy a large amount of disk space. Why? As photos could be easily generated on your Mac via many paths, such as screenshot captures, photo downloads, camera imports, etc. Moreover, there could have some useless photo duplicates. With time passed by, the accumulated images will eat up the drive’s storage and in turn drag down your Mac. Therefore, it’s suggested to regularly delete unneeded photos on your Mac and you could follow this guide to proceed.
Part 1: How to Delete Photos on Mac
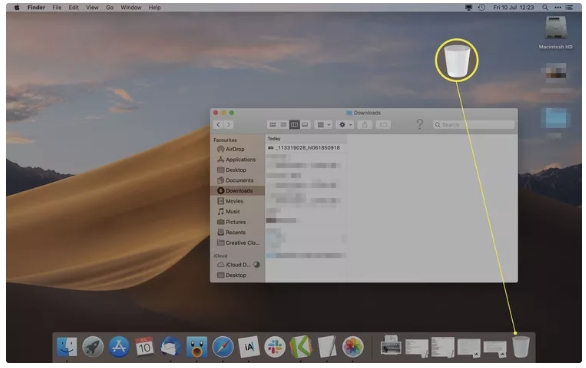
Way 1. Delete Photos from Mac via Trash Bin
This is a common way to delete pictures on Mac and is usually available for deleting pictures from Desktop, Downloads, and other locations outside the Photos app. To try this way, 2 steps are needed.
Step 1: Locate the photo you want to delete and then choose it. To select multiple images, you can hold down the Command key and click on each file, or use the mouse to select multiple files by drawing a selection box.
Step 2: Drag the chosen photos to the Trash icon and you will find them moved to Trash.
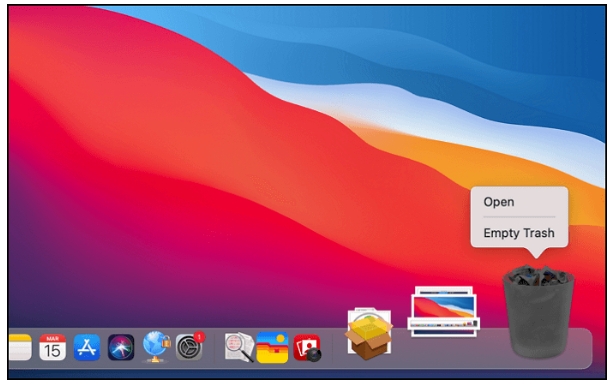
Tips: If you want to permanently delete the photos, you could right-click the Trash icon and click Empty Trash.
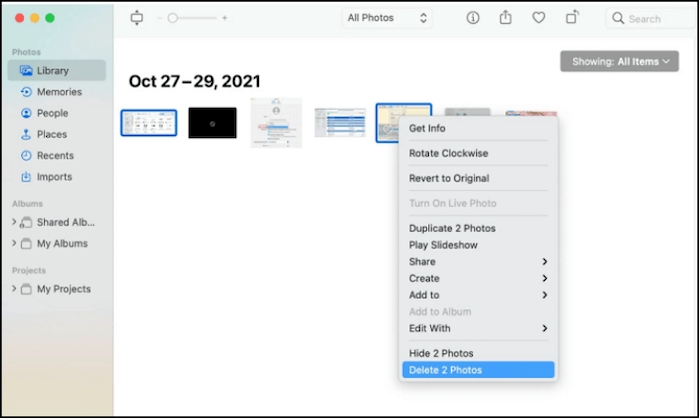
Way 2. Delete Photos on Mac's Photo App
Photo is a built-in app of macOS for users to organize, view, edit, and share their photos and videos. You can delete photos like screenshots and imported images via this useful Mac app. Following is how to delete pictures using Photo app.
Step 1: Launch Photo app.
Step 2: Find and select the unwanted photo. If you need to delete all pictures, you could use Command+A on your keyboard to make them selected. Then, press Delete button on your keypad and confirm your operation of deletion on the pop-out. The deleted photos will be sent to the Recently Deleted folder.
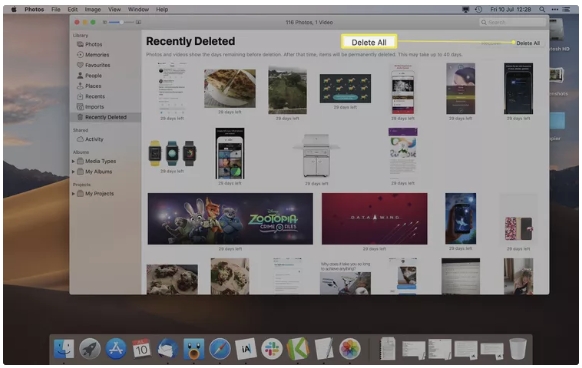
You could empty this folder by clicking Delete All in the Recently Deleted interface.
Part 2. How to Permanently Delete Photos on Mac
When you are emptying the Trash Bin or Recently Folder after file deletion for privacy protection, a prompt will be shown to warn you that the files will be permanently deleted. You might confirm your operation and believe that all deleted data are erased instantly yet completely. However, it’s a pity to tell you that the removed files would not be forever removed until new data are written into the disk. So, is there any way that can immediately and permanently delete your photos once you run the deletion operation? Yes, just use Macube Cleaner, a powerful all-in-one toolkit for Mac. Macube Cleaner provides a bundle of functions like File Shredder, Junk Cleaner, and Privacy Protector, enabling you to clean up, protect and manage your Mac in one place. Its File Shredder feature is extremely outstanding, which can not only completely erases your files without leaving a trace but also excels in removing stubborn documents. Additionally, Macube Cleaner provides a 7-day free trial with full function. Sound great, right? You could download it via the button below to have a try.
Features:
- Provide Junk Cleaner and Large & Old files functions for you to effectively free up disk space.
- Available to securely protect your privacy with File Shredder and Privacy Protection functions.
- Support Duplicate Remover yet Similar Image Finder functions, easily deleting unnecessary files from your Mac.
- Offer App Uninstaller as well as Extension Manager functions to help you conveniently manage your software.
- Compatible with macOS 10.10 or later.
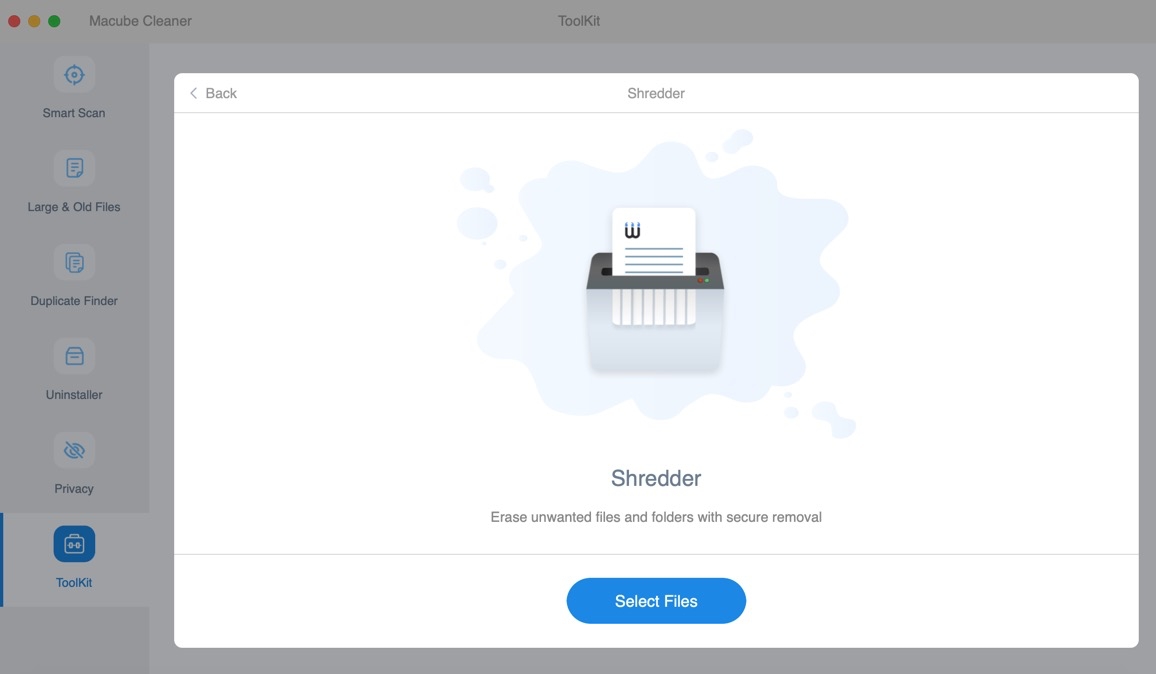
3 steps to permanently delete photos on Mac
Step 1: Launch Macube Cleaner and switch to Toolkit for selecting File Shredder.
Step 2: Click Select Files and choose the file you hope to forever erase.
Tips: The files deleted with File Shredder cannot be recovered.
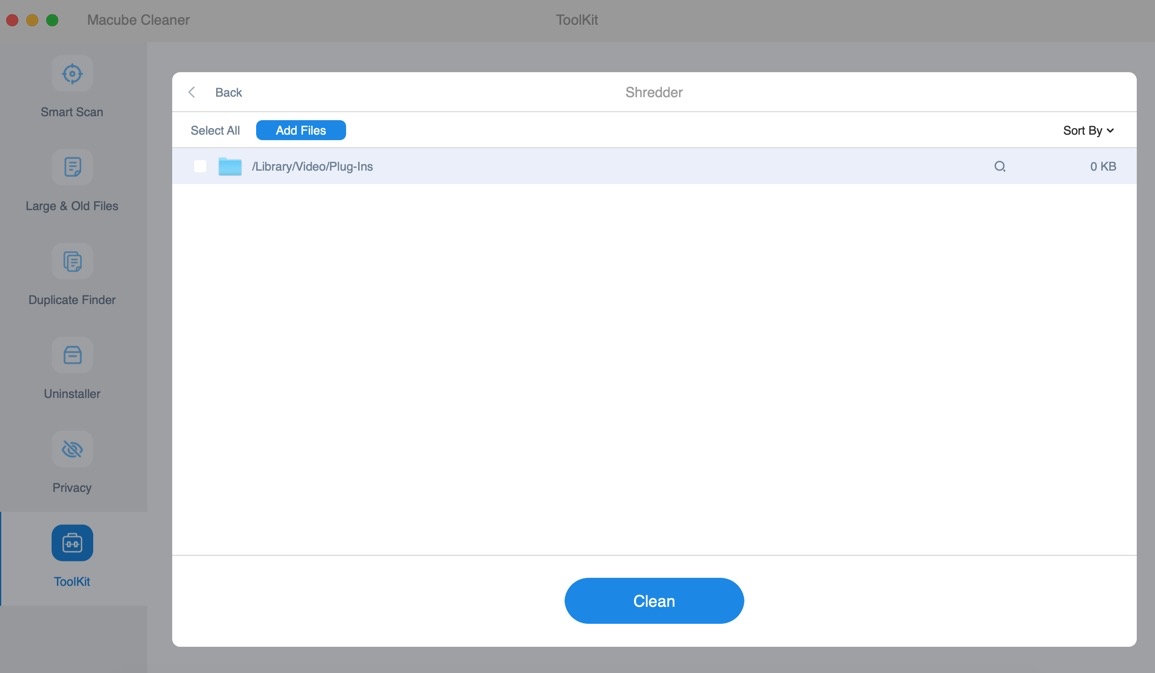
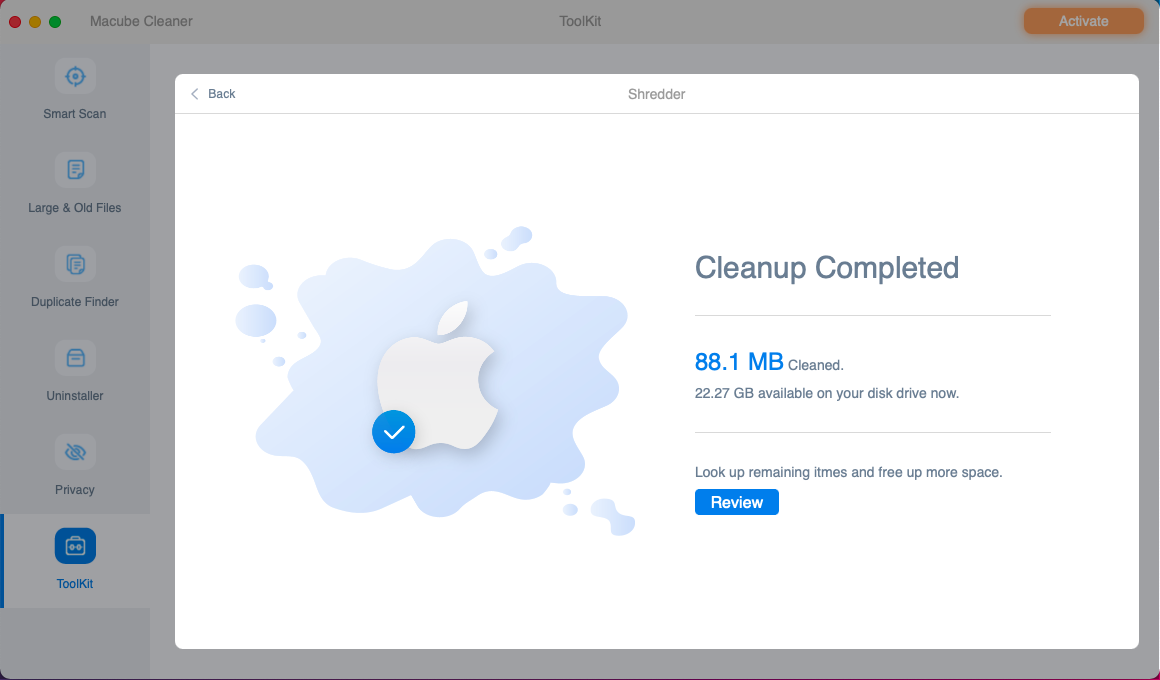
Step 3: Hit Clean to permanently delete the selected files.
Part 3. How to Recover Deleted Photos on Mac
Sometimes, you might delete valuable photos from your Mac by mistake. At that time, you could get back your pictures using specific methods depending on the photo-loss situation.
If the photos are simply sent to the Trash Bin, you could go to Trash Bin, right-click the target photos, and select Put Back to restore them.
When the pictures are removed from the Photo app, you can head to the Recently Deleted folder in Photo app first. Then select the images you want to restore and choose Recover.
When it comes to the scenarios such as recovering photos from the emptied Trash Bin/Recently Deleted folder or retrieving pictures lost due to virus attack, you need a professional data recovery tool and Eassiy Data Recovery is highly recommended here. Eassiy Data Recovery could assist you in retrieving lost photos in various formats like JPG/JPEG, PNG, GIF, BMP, etc from emptied Trash/Recently Deleted folder, internal partitions, external drives, and more on Mac and Windows. No matter your photos are deleted because of accidental operations, virus infection, formatting, or others, it allows you to get back deleted photos within fingertips and with 98.6% Success Rate.
Features:
- Support recovering photos, videos, documents, audio, emails, etc from different storage devices including flash drives, hard drives, memory cards, digital cameras, and camcorders.
- Available on retrieving data deleted or lost led by accidental deletion, formatting, corruption, system failure, etc.
- User-friendly yet comprehensive interface, walking you through the entire data recovery process within 3 steps.
- Provide Preview function, helping you locate the wanted pictures accurately.
Recover deleted photos within 3 steps
Step 1: Open Eassiy Data Recovery on your Mac. Check Images and select the location where images were saved before deletion. Next, click Scan and the software will start to find all lost photos for you.

Step 2: Navigate to needed images and preview them before recovery to ensure they are what you want.

Step 3: Select the target images. Then, hit Recover and set a secure location for storing the recovered photos.

Conclusion:
If you are planning to delete photos on your Mac to free up more space or privacy protection, don’t hesitate to try the mentioned ways in this post, especially using Macube Cleaner which can forever delete images. While you accidentally remove important images during deletion, no worry, Eassiy Data Recovery is here to help retrieve lost photos within several clicks for you.
Hot Articles
Macube Cleaner
Speed up and troubleshoot your Mac super easily with a Macube full-featured free trial!
Start Free Trial