Freeing up storage space on your device improves performance, enhances file organization, and enables efficient backup options. Deleting iTunes won't erase your music files, as they are stored separately. However, it's important to manually back up your iTunes backup files before removing iTunes. These files can be found in the iTunes folder on your computer. By following the steps, you can safely delete iTunes without losing your music and ensure the safety of your backup files. In this guide, we are going to describe to you how to delete iTunes from Mac.
Part 1: Preparing for iTunes Deletion
A. Backing Up Your iTunes Library and Files
To ensure data safety, it's advisable to create a backup of your iTunes library and other important files before deleting them. Follow these step-by-step instructions to create a backup on your Mac:
Step 1: Access Finder and locate your Home folder.
Step 2: Find and open the "Music" folder.
Step 3: In the "Music" folder, find the "iTunes" folder and create a copy by right-clicking and choosing "Duplicate" or by using the shortcut Command + D.
Step 4: Rename the duplicated folder to differentiate it from the original, such as "iTunes Backup."
Step 5: Store the backup folder in a secure location, like an external hard drive or cloud storage service, for safekeeping.
B. Exploring Alternative Music Management Options
Apart from iTunes, there are several alternative software and streaming services for Mac music library management:
- Spotify: Offers a vast music catalog, personalized playlists, and the ability to curate your library.
- Apple Music: Apple's streaming service with millions of songs, radio stations, and seamless integration with Apple devices.
- VLC Media Player: Versatile media player with playlist management and customizable equalizer settings.
- Plex: Media server software for organizing and streaming your music library across devices, with features like automatic metadata retrieval and remote access.
- Foobar2000: Lightweight and customizable music player supporting various formats, featuring gapless playback and a customizable interface.
These options provide diverse features, allowing you to choose based on your preferences and needs.
C. Make sure that you signed in your Mac as root administration permission
Before proceeding with any significant changes to your Mac, it's crucial to verify that you have administrative permissions (administrator access). Follow these steps to check if you have the necessary permissions:
- Tap the Apple logo located at the top-left corner of the screen.
- From the dropdown menu, you have to choose "System Preferences."
- In the System Preferences window, navigate to "Users & Groups" (or "Users & Accounts" in some macOS versions).
- Check the left sidebar for your account name; if you have administrative permissions, it will be labeled as "Admin" below your account name.
If your account lacks administrative permissions, you will either need to log in as an administrator or contact someone with administrative privileges to proceed with the deletion of iTunes.
D. Uninstalling iTunes (and Other Apps) on Mac requires you to quit iTunes first
To uninstall iTunes (and other apps) on a Mac, first, quit iTunes. Then, follow these steps:
- Quit iTunes by choosing "Quit iTunes" from the "iTunes" menu.
- Open Finder and go to "Applications" in the left sidebar.
- Find "iTunes" in the Applications folder.
- Drag the iTunes icon to the Trash in your Dock or right-click and select "Move to Trash."
- Empty the Trash to permanently delete iTunes from your Mac.
Always back up your iTunes library and files before uninstalling any application to avoid data loss.
Part 2: 5 Methods for How to Delete iTunes from Mac
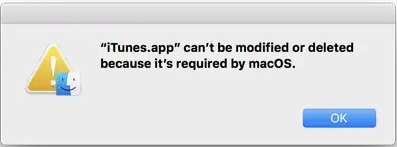
As there is no official guide on the Apple support website, it requires additional steps to perform a thorough and delete iTunes from macOS. It's crucial to exercise caution and ensure a complete understanding of the process since iTunes is an essential application for macOS. Take necessary precautions and maintain control throughout the uninstallation procedure. Here are the methods for how to delete iTunes from Mac.
Method 1: Using the Applications Folder
For a complete uninstallation of iTunes, you can manually remove files related to the app, including the app itself, libraries, preferences, and other associated files. However, if you prefer a simpler method, proceed to the next section to learn how to automatically uninstall iTunes with just a few clicks. Keep in mind that this complete removal will reset iTunes to its default state upon reinstallation, resulting in blank playlists and an empty music library. Get ready for some technical details.
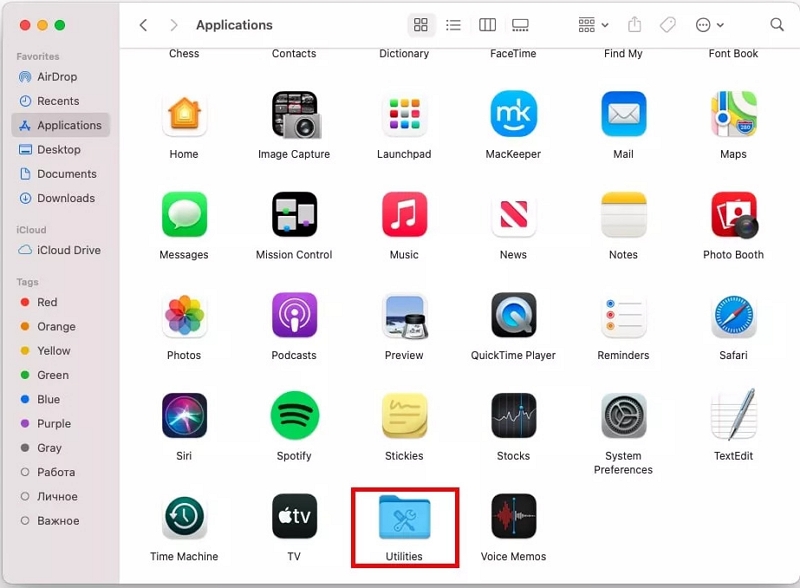
Step 1: Open Finder, choose "Applications" from the left sidebar, and double-click the "Utilities" folder.
Step 2: Open the Utilities folder and start Activity Monitor.
Step 3: In Activity Monitor, double-click on iTunesHelper and click "Quit" in the opened window. To boot your Mac into Recovery mode, press and hold Cmd + R during startup.
Step 4: To open the Terminal in Recovery mode, select Utilities from the menu bar and choose Terminal.
Step 5: In the Terminal, type "csrutil disable" and press Enter to disable System Integrity Protection (SIP). Note that disabling SIP significantly increases the risk of malware attacks on your Mac.
Step 6: To access the Applications folder, type "cd /Applications/" in the Terminal and press Enter.
Step 7: To mount the folder as writable, type "sudo mount -uw /System/Applications" in the Terminal and press Enter.
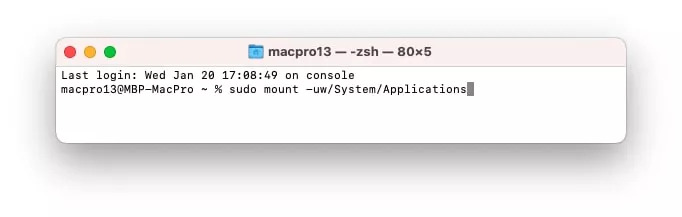
Step 8: Provide your Mac administrator password when prompted.
Step 9: To delete iTunes, type "sudo rm -rf iTunes.app/" in the Terminal and press Enter. Afterward, restart your Mac.
Step 10: To ensure the security of your Mac, boot into Recovery Mode once again by holding Cmd + R during startup. Please note that this step is crucial for maintaining the protection of your system.
Step 11: Open Terminal and type "csrutil enable" in the Terminal window. Press Enter to enable System Integrity Protection (SIP).
Method 2: Using Finder
Here are the steps to use Finder to delete iTunes on Mac:
Step 1: Navigate to Finder, then click on Applications.
Step 2: Choose iTunes.app and drag it to the Trash bin.
Step 3: Right-click on the Trash icon and select "Empty Trash" from the context menu.
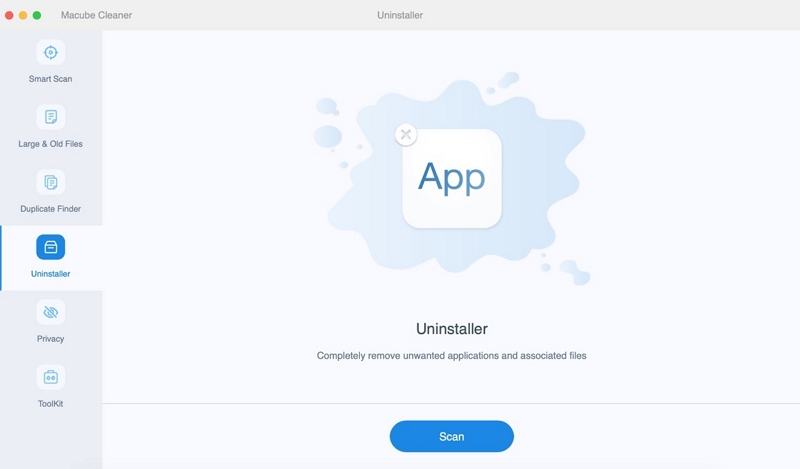
Method 3: How to Delete iTunes on Mac Using Macube
Macube is an impressive third-party application that has the availability of uninstalling applications of Mac. It stands out in the market by offering a comprehensive range of features, including a duplicate finder, management of large and old files, and a shredder. By utilizing this program, you can quickly declutter your Mac in a matter of seconds and reclaim a significant amount of storage space. With Macube, the tedious task of removing duplicate files, which would otherwise consume hours of your time, becomes effortless. Moreover, Macube efficiently eliminates unnecessary files and improves file organization. Its advanced algorithm can even detect similar images, enabling you to remove them before deciding which ones to keep. It allows you to clear your browsing history and keep your browser data private with just a single click. By leveraging this powerful Mac cleaner, you can effortlessly and securely eliminate unwanted apps within minutes.
Features:
- Eradicate applications on Mac, leaving no residual app files behind.
- It effectively identifies gigabytes of redundant files residing in macOS system folders, iTunes, photos, mail, browsers, and even large, outdated files.
- Offers expert support by delivering prompt responses to your emails within a 24-hour timeframe.
- Relevant for enhancing Mac security through the uninstallation of malware.
- Enables swift and secure removal, saving both time and effort effectively.
Here are the steps to delete iTunes on Mac using Macube
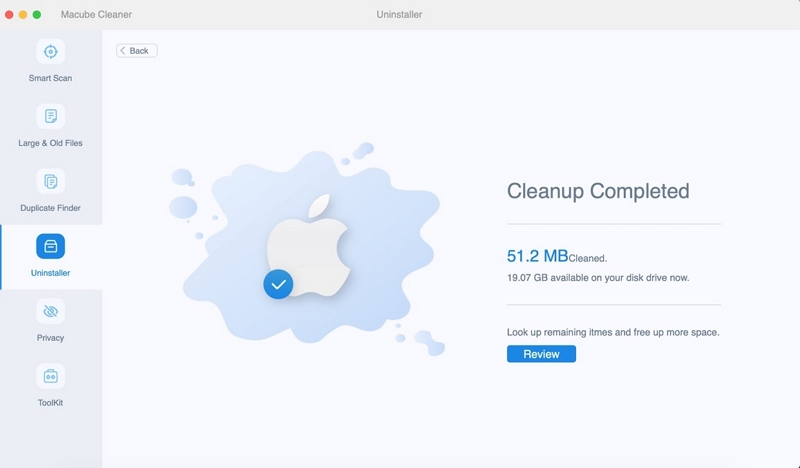
Step 1: Navigate to the Uninstaller section in Macube, then choose the Scan option.
Step 2: Preview the results and choose the unnecessary applications accordingly.
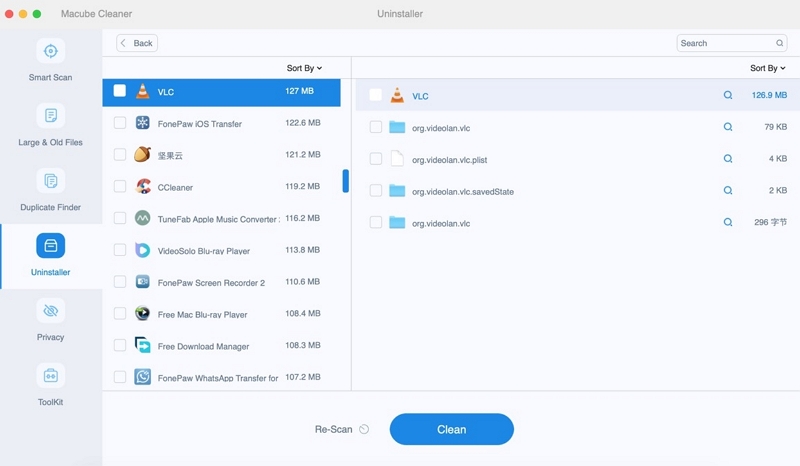
Step 3: Remove applications and trace files from your Mac effectively.
Method 4: Manual Deletion via Library Folders
An iTunes backup typically occupies a minimum of 1 GB of storage, and in certain instances, it can even exceed 10+ GB. Furthermore, macOS does not automatically delete these files, making it crucial to remove outdated backup files when they are no longer needed. Follow the below-given instructions to do so:
Step 1: First, you have to launch the 'iTunes application on your Mac.
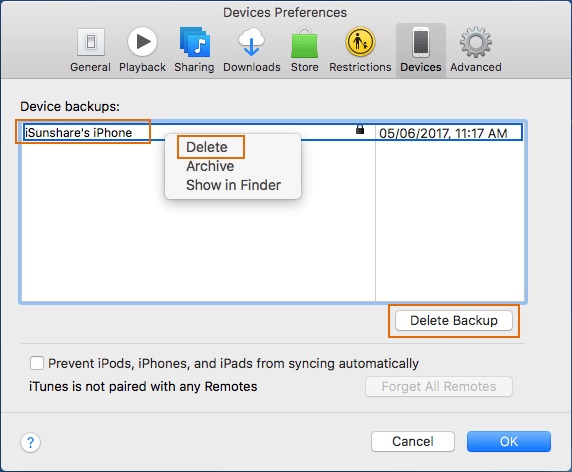
Step 2: Navigate to the 'iTunes menu and select the 'Preferences' option.
Step 3: Click on 'Devices' within the window, and you will be able to see all the backups stored on your Mac.
Step 4: Based on the backup date, determine which ones you wish to delete.
Step 5: Select one backup and click on 'Delete Backup'.
Step 6: When prompted to confirm the deletion of the backup, please select 'Delete'.
Method 5: Utilizing Terminal Commands for Advanced Users
After uninstallation, iTunes has left behind all the necessary files, which are now taking up valuable storage space on your Mac. Let's proceed to remove them:
Step 1: Open Terminal on your Mac.
Step 2: Enter the following command in Terminal: `cd /Users/your_username/Library/Preferences`, then press the Return key.
Step 3: Enter the command: `rm com.apple.iTunes`, then quickly press the Tab key twice.
Step 4: Choose any file from the autocomplete list, then press the Return key to proceed.
Step 5: Continue to repeat steps 3 and 4 for all the remaining files.
Step 6: Enter the following command in Terminal: `cd /Users/your_username/Library/` and then press the Return key.
Step 7: Enter the command: `rm -rf iTunes/`, then press the Return key to execute it.
Step 8: Enter the command: `cd /Users/your_username/Library/Preferences/ByHost/` and press the Return key.
Step 9: Enter the command: `rm com.apple.iTunes`, then quickly press the Tab key twice.
Step 10: Choose any file from the autocomplete list, then press the Return key to proceed.
Step 11: Continuously perform steps 9 and 10 for all the remaining files.
Part 3: Handling Music and iTunes Backup Files
A. Recovering Lost Music Files after iTunes Deletion
To recover your music files:
- Check your computer or device for locally stored music files.
- Check backup storage like external drives or cloud services for your music files.
- Restore from a previous backup if you have backup software.
- Connect other devices and search for music files to copy or transfer.
- Log in to online music platforms and download your music files.
- If needed, contact support or data recovery professionals for assistance.
Remember to regularly back up your music files and store copies in different locations to prevent data loss.
B. Deleting iTunes Backup Files
To locate and delete iTunes backup files:
Step 1: Launch iTunes and navigate to Preferences.
Step 2: Select the Devices tab to view the backup files by device name and date.
Step 3: Hover over a backup name to see its size.
Step 4: Find backup files on your computer:
- Mac: Go to Finder > Go > Library > Application Support > MobileSync > Backup.
- Windows: Navigate to "C:\Users[YourUsername]\AppData\Roaming\Apple Computer\MobileSync\Backup".
Step 5: Delete backup files by selecting and permanently deleting them or moving them to the Trash/Recycle Bin.
Step 6: Confirm the deletion as it is irreversible.
By following these steps, you can free up storage space by locating and deleting iTunes backup files. Ensure you no longer need the backups and have alternative backup methods in place.
Conclusion
In conclusion, deleting iTunes from your Mac can help free up storage space and improve performance. We discussed several methods for deleting iTunes, including manual deletion, using Finder, Macube, and Terminal commands. It's important to remember to back up your iTunes library and files before deletion and explore alternative music management options like Spotify or Apple Music. Additionally, we provided instructions for deleting iTunes backup files to further free up storage. To ensure a smooth deletion process, we recommend restarting your system after deletion and verifying the removal of associated iTunes components. For a comprehensive and efficient Mac cleaning solution, consider using Macube, a powerful third-party application. Keep your music files safe, organized, and easily accessible by implementing proper backup measures and exploring alternative music management options.
Hot Articles
Macube Cleaner
Speed up and troubleshoot your Mac super easily with a Macube full-featured free trial!
Start Free Trial