Mac, manufactured and licensed by Apple Inc., is the second most popular device and operating system, right after Microsoft Windows. In 2024, more than 100 million users worldwide are using Macintosh, and 10% of all PC and laptop sales were from Mac. Mac Pro, Macbook, Macbook Pro and iMac are some of the most popular devices sold by Apple, and it is growing day by day.
If you are reading this article, chances are, you are a regular MacOS user and facing network issues. If you are thinking about how to clear DNS Cache on Mac, this is the article for you. In this article, we will look at what DNS and DNS caches are, why you need to flush your DNS cache in your MacOS regularly, and how to do that. We will go through some regular methods for flushing DNS cache on Mac, and then we will discuss the simplest and easiest way to do it.
Part 1: What Is DNS Cache On Mac And Why Do You Need To Flush It?
To clear DNS on Mac or refresh the DNS cache, we need to understand what a DNS cache is. Domain Name System (DNS), is a service where the name of a website is linked to an IP address. Every device has an IP address, which is a set of letters and numbers. DNS attaches a “domain name” to this address, so it is easily understandable and memorable.
A DNS cache is a temporary database on your device, whether it is a computer or a smartphone, which stores the DNS data. Like all devices, Mac devices store all DNS data in a local storage area called a DNS cache. By doing so, it stores the data from your previous visit in this cache, which allows the page to load at lightning-fast speed and makes your browsing faster.
When you write a domain name in your browser, the browser’s resolver uses this to send a query to the DNS server, which brings up the IP address linked to the domain name. This “domain-to-IP mapping” is saved in the cache for future use, which makes page load times faster and also puts less pressure on the servers hosting the DNS data every single time your browser makes a request.
So, this seems like a good idea to keep your DNS cache intact indefinitely. Well, there are several reasons why resetting DNS or flushing DNS cache in MacOS becomes necessary:
- If a website you’re trying to access switches to a new server, moves to a different server location, or changes its web hosting services, you’ll get a 404 error. It’s because your browser is trying to load the site in the same location based on outdated cache data.
- Hackers can corrupt the DNS records by an attack known as “DNS spoofing” or “DNS cache poisoning, where they gain access to your cache and change the IP address associated with the domain name, which is used for phishing attacks. If you suspect this happening, you need to routinely clear your DNS cache.
- Sometimes if you have errors accessing a website, or the website loads incompletely or improperly, usually users resort to clearing their browser’s cookies and temporary internet files. If this doesn’t work, DNS flush or reset DNS in Mac is an option.
- Both OS and browsers keep a comprehensive record of the domain-to-IP mapping, thus keeping track of your browsing history and browsing behaviour. Flushing the DNS cache clears this up and keeps intruders from being able to access your data. If privacy is very important to you, it’s important to clear the MacOS DNS cache.
Now you see why it’s important to clear the DNS cache. If you’re using a Mac OS, it’s quite a simple process. The following section will detail how to do this.
Part 2: Ways to Clear or Flush DNS Cache on Mac
So, now that we understand why it is important to regularly flush the DNS cache in Mac, let’s go through some methods, starting from the easiest to the most complicated.
Method 1: Clear DNS by Restarting DNS Service
The easiest and first method to clear the DNS cache on MacBook is to go through the “off and on” method.
Step 1: Turn your router off.
Step 2: Wait 10 seconds and then turn it on again. This ensures that you start afresh with your DNS settings. However, this method is quite distracting and you have to wait a while for the services to restart.
Method 2: Using Terminal to Clear DNS Cache on Mac
Here is how to clear the DNS cache on Mac using Terminal –
Step 1: Find the Terminal
You can do this in several ways –
- In your taskbar, go to Applications > Utilities > Click on Terminal
- Press Command + Space key and a search option will come up. Type "Terminal" and press return.
Step 2: In the Terminal, write the following code –
sudo dscacheutil -flushcache; sudo killall -HUP mDNSResponder
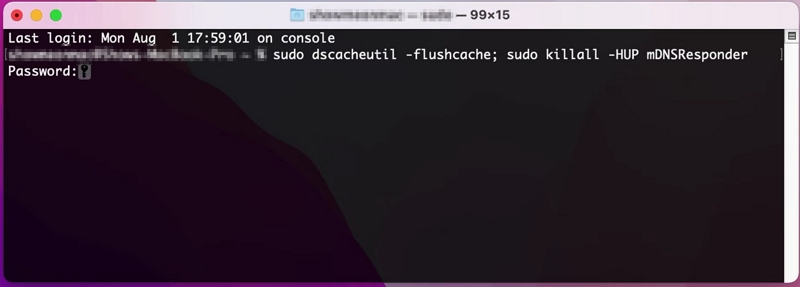
Step 3: Then the terminal will prompt you for your login password. Type your password. You will notice that your password or any other character isn't shown as you type. Press return.
The difficulty of flushing the DNS Mac terminal is that it's vital to check your macOS version before attempting to flush your DNS cache through the Terminal. That’s because different commands apply to different macOS versions. Therefore, the method detailed in the previous section to flush DNS in MacOS will work on the latest MacOS. For other MacOS versions, check the following list:
|
Version |
Command |
macOS Ventura, macOS Monterey, macOS Big Sur |
sudo dscacheutil -flushcache; sudo killall -HUP mDNSResponder |
macOS Catalina, Mac OS X El Capitan, OS X Mavericks |
sudo killall -HUP mDNSResponder |
macOS Mojave, macOS High Sierra, macOS Sierra, OS X Mountain Lion, Mac OS X Lion |
sudo killall -HUP mDNSResponder |
OS X Yosemite |
sudo discoveryutil mdnsflushcache; |
Mac OS X Snow Leopard |
sudo dscacheutil -flushcache |
Mac OS X Leopard |
sudo lookupd -flushcache |
Mac OS X Tiger |
lookupd -flushcache |
Before trying this method, it is important to check your MacOS or MacOS X version.
Method 3: Manually Clearing the DNS Cache from Finder
You can also manually clear your DNS cache by clearing the system cache through Finder
Step 1: Open Finder
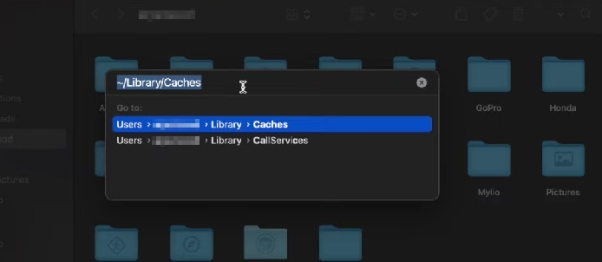
Step 2: From Taskbar, Click Go > “Go to folder…”
Step 3: Type “~/Library/Caches” and it’ll open the Caches folder.
Step 4: Select all and press delete. This will delete all the cache files that your browser accesses.
Method 4: Configuring DNS Servers from Browsers
You may also flush the DNS cache from your browser's settings. Keep in mind that this is separate from the browser’s cache that you can clear through erasing your browsing data. Here we will see how to do that for some of the most popular browsers in MacOS and MacOS X – Safari, Chrome and Firefox.
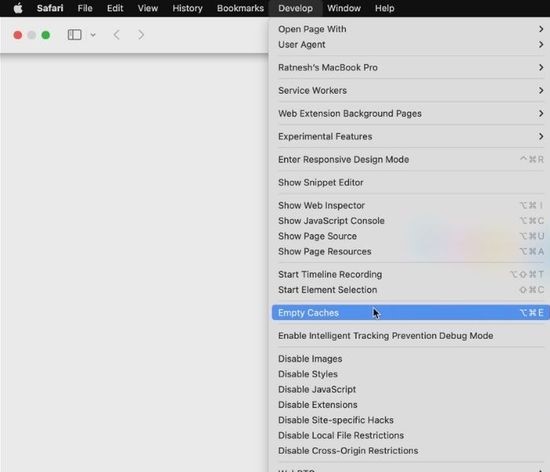
In Safari:
Step 1: If you don’t have the “Develop” menu, you need to set it up. Click “Safari” on the menu bar and click on “Settings”
Step 2: Click on the “Advanced” tab. Check “Show Develop menu in menu bar” and close the Settings window. You will see the “Develop” menu.
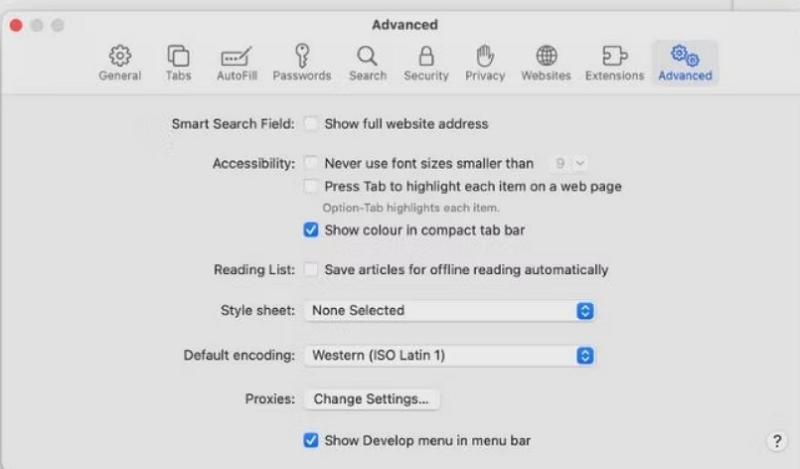
Step 3: On the menu bar click on the now visible “Develop” bar and find “Empty cache”. Click on it and Safari will flush its DNS cache.
In Chrome:
Step 1: Go to your browser’s address bar and type the following: chrome://net-internals
It’ll navigate to the internal settings tab. Click on the DNS tab.
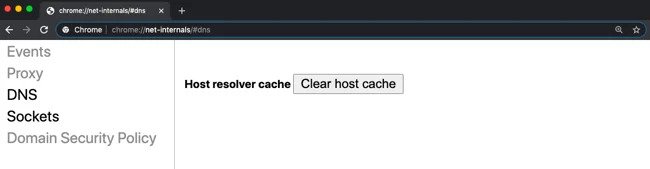
Step 2: Press the “Clear host cache” button. Chrome will flush its own DNS cache.
In Firefox:
Step 1: In Firefox browser’s address bar, type “about:networking” and it will take you the the Networking section of Firefox’s internal settings.
Step 2: Click on the “DNS” tab, and click the “Clear DNS Cache” button.
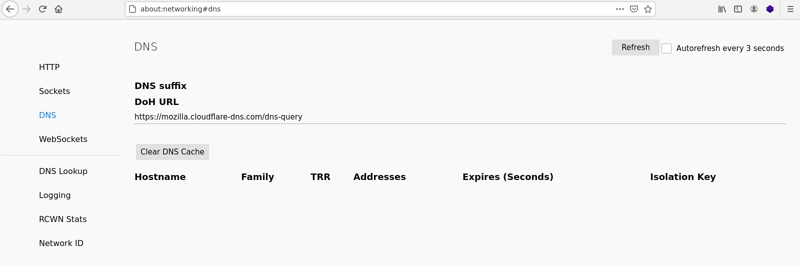
This will clear the DNS cache of Firefox.
Note: As browsers’ DNS caches are different from MacOS system’s DNS cache, this may solve your networking issues but to clear the DNS cache from your system, you need to try other methods.
Part 3: Mac Refresh DNS Methods
If the previous methods didn’t work for you, you can try flushing the DNS cache on Mac by refreshing the DNS from the system.
Method 1: Configuring Custom DNS Servers for Mac
You can also use custom DNS Servers provided by web hosts for public use for DNS refresh in Mac. DNS Server that is allowed to you by your Internet Service Provider (ISP) through your router may be clogged by heavy traffic, so this is one potential method for MacOS refresh DNS:
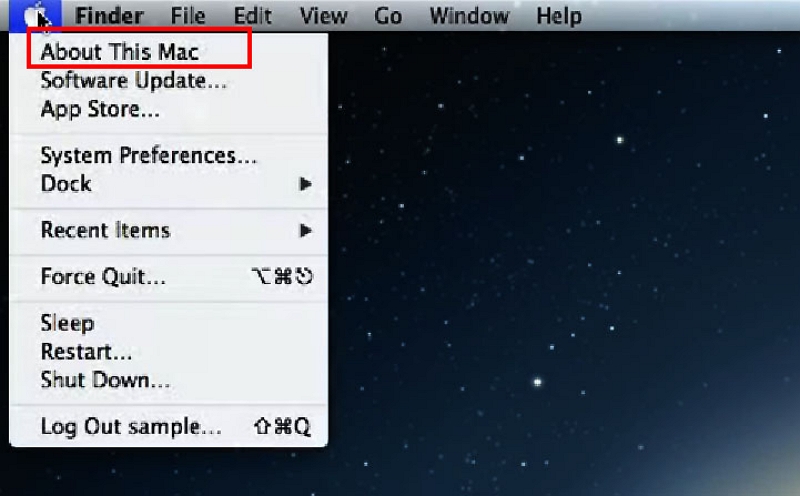
Step 1: Click the Apple icon, go to System Preferences > Network
Step 2: Select the Network service where you want to reset your DNS service, for example, click "Wi-fi", and click "Advanced".
Step 3: Click the “DNS” tab. You’ll see your IP address which is served by your router.
Step 4: Now you need to add your DNS server by clicking the “+” button. For example, Google provides a DNS server with the following IP address
8.8.8.8
8.8.4.4
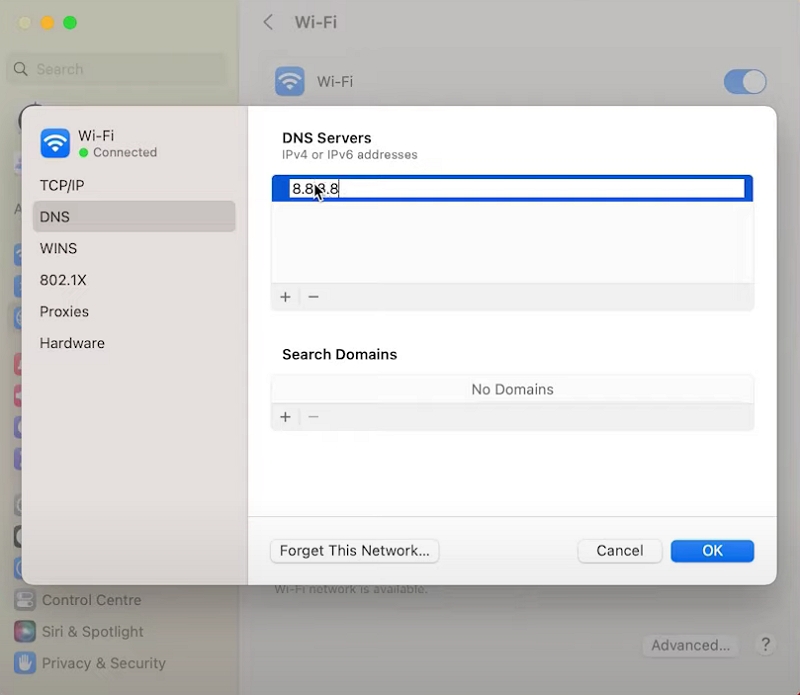
Step 5: Click “OK”
Now you can access the internet using Google’s DNS Server, or any custom DNS server. Remove the IP address using the “-” icon and add it again to start fresh.
While the process is starting, this will cause temporary service disruption and keep you offline. If you are removing and re-adding the IP addresses, it's important to take note of the addresses and save them to use them again later.
You may also avail of the CloudFlare custom resolver with the address “1.1.1.1”
After clicking the “+” button, type any of the following:
1.1.1.1
1.0.0.1
Usually, the further a server is located from your location, the more it impacts your network speed.
Part 4: Reset DNS Settings on Mac
If flushing or refreshing the DNS cache didn’t work for you then you may try resetting the DNS settings in MacOS to start from scratch.
Method 1: Resetting Network Settings for Wi-fi on Mac
Resetting network settings clear all your network-related information, such as saved Wi-Fi login credentials, paired devices and so on. If you want to know how to reset DNS settings by resetting Wi-Fi settings, follow these steps:
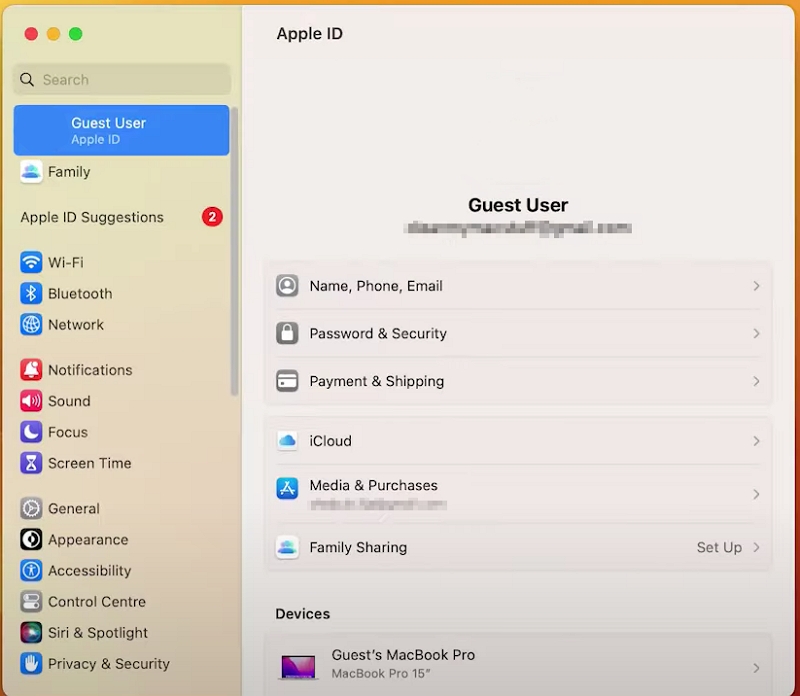
Step 1: Click the Apple icon > Systems Settings
Step 2: Click "Wi-Fi" from the sidebar with your Wi-Fi connection name, usually it's the topmost one.
Step 3: Click the “-“ (minus) icon underneath the list of connections. This will remove your Wi-Fi settings entirely.
Step 4: Click the “+” icon beside to re-add your Wi-Fi connection.
Method 2: Manually Clearing the DNS Cache from Finder
This is not completely full proof as sometimes you may still face network issues. Then it may be time for you to delete the configuration system files manually to reset Mac DNS.
Step 1: Turn off your Wi-Fi
Step 2: From the taskbar, click on Go > Go to Folder…
Step 3: Type in the search bar “/Library/Preferences/SystemConfiguration/”, press return
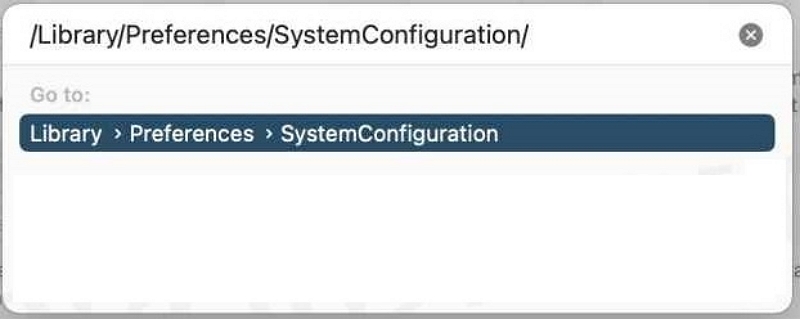
Step 4: From the SystemConfiguration folder, delete these five files (don’t forget to keep a backup):
- com.apple.airport.preferences.plist
- com.apple.network.identification.plist or com.apple.network.eapolclient/configuration.plist
- com.apple.wifi.message-tracer.plist
- NetworkInterfaces.plist
- preferences.plist
Step 5: Restart your Mac and turn on your Wi-Fi again. These files are recreated and as a result, Mac resets the DNS cache.
Part 5: Use Macube for MacOS Flush DNS or Clear DNS Cache on Mac
If you are looking for a simpler and easier way to flush the DNS cache in your Mac devices, Macube is the app for you. Macube is one of the most reputed third-party software for MacOS used by 200,000+ users worldwide. Its simple and powerful functionalities make it one of the best cleaning apps for MacOS and MacOS X found on the market.
This software comes with all the functions to accurately discover all junk from the MacOS system directory, iTunes, browser data, mail attachments, and photos and clean those in one go. It also detects unused apps, large files, duplicate files and even duplicate image files which wouldn’t have been possible before without manual process. Which basically boosts your Mac device’s performance, optimizing your storage space and saving you time.
If you are especially concerned about privacy and safety, it can easily and efficiently clear your browser history and private browsing history - making it truly an all-in-one software that saves you the hassle of buying multiple software. In this way, Macube can become the go-to software that you will end up using daily.
Features:
- Eight different applications under one umbrella that can be operated in one click.
- Maintain privacy and safety by deleting cookies, browsing history, downloads, private browsing data and potential malware.
- Securely clear and manage old and large files and Mac extensions.
- Accurately and automatically detect duplicate files and similar images and organize them categorically for optimum storage management.
- Completely erase redundant data and undeletable applications without leaving any trace.
- Guaranteed after-sales service with 24/7 support.
Using Macube to Clear Cache in 3 Steps:
Step 1: Open the App and click “Smart Scan” from the sidebar.
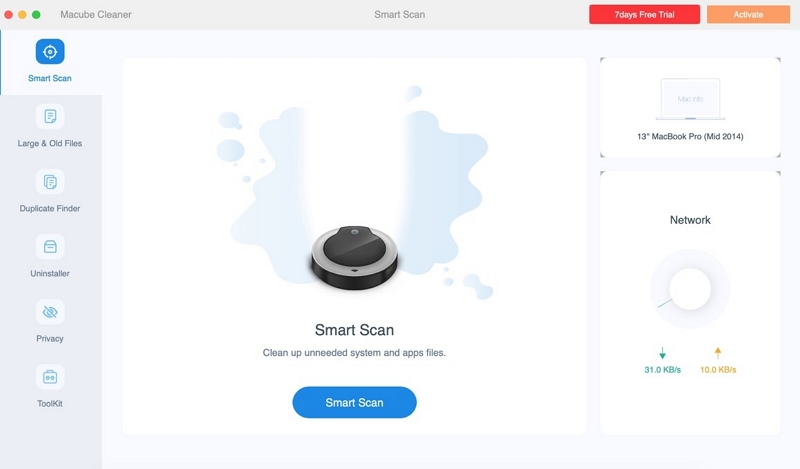
Step 2: Press “Smart Scan”. Macube will begin analyzing and will present you with the results in a categorized format.
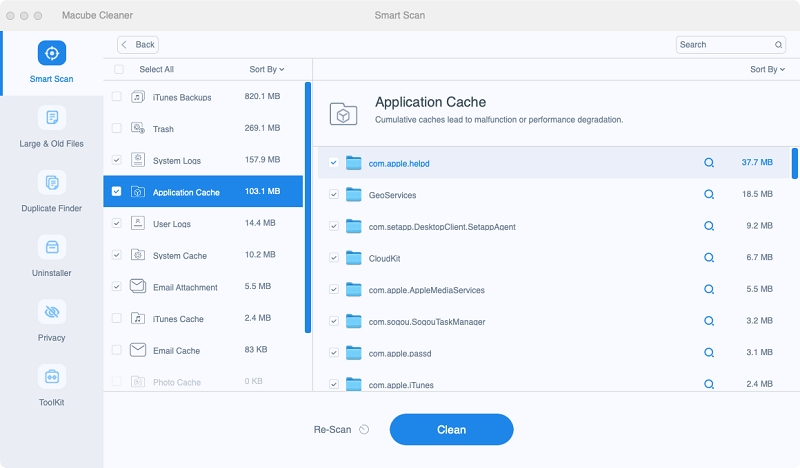
Step 3: Select the cache you want to delete and press “Clean”.
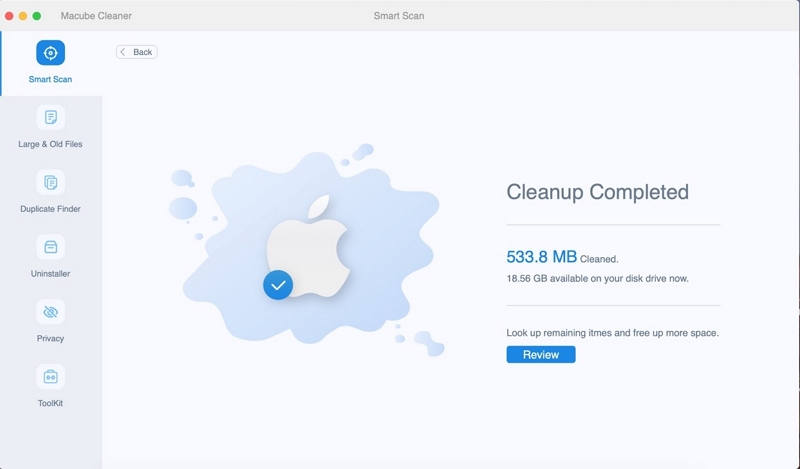
That’s it! The process depends on the size of your files, but on average it takes a couple of seconds for the process to complete.
FAQ: Flushing DNS Cache on Mac
Q: Is it safe to flush the DNS Cache?
Answer: Yes, it's safe to flush DNS from time to time. If you run into trouble accessing sites or keep getting 404 errors, it is recommended that you run DNS cache flush.
Q: How often should I flush my DNS cache?
Answer: It depends on your internet and computer usage. If you're heavily browsing the web, tend to go to a lot of different websites, and collect data from different external sources, you may be open to cache spoofing/ poisoning. Therefore, it's recommended to clear the DNS cache on Mac from time to time.
Q: Does DNS flushing make your internet speed faster?
Answer: Not necessarily, as you are essentially clearing up your database and this information needs to be loaded up again. However, this ensures that your websites always load with up-to-date IP addresses and information, resulting in safe and fast loading the second time you access them. So, consider a MacOS flush of the DNS cache.
Conclusion:
Browsing the internet is a regular activity for people of all ages. To ensure the highest performance and utmost security, it is really important to keep in mind that one needs to flush their DNS cache at regular intervals. There are many ways to flush the DNS cache in the system which are not always reliable or easy, therefore it is recommended to use Macube software. It is fast, efficient, and highly user-friendly, and it assures that you can only use one software for any and all memory, storage and file management requirements. Get your 7-day free trial and test out this amazing all-in-one Mac solution today.
Macube Cleaner
Speed up and troubleshoot your Mac super easily with a Macube full-featured free trial!
Start Free Trial