Are you looking for ways to uninstall GarageBand from Mac? You're not alone. As we all know, Garageband is a popular open-source music creation software for Mac that facilitates easy recording and editing of music or audio. If you're wondering of how to uninstall Garageband on Mac, app on your system, this post got you covered with four different methods that can be used to perform the operation seamlessly. Keep reading.
Part 1: Benefits of Uninstalling GarageBand
Some of the benefits of uninstalling GarageBand from your Mac includes the following;
A. Freeing up storage space
GarageBand can take up a considerable amount of space on your Mac, which can be a problem if you have limited storage. By uninstalling it, you can free up space that can be used for other purposes, such as storing important files or installing other software.
B. Enhancing system performance
If you have noticed that your Mac is running slow or experiencing lag, uninstalling GarageBand can help to enhance its performance. This is because the app can consume significant system resources, which can impact the overall performance of your device.
C. Removing unwanted or unused software
This is another benefit of uninstalling Garageband on Mac. Suppose you don't use GarageBand or have found a better alternative for your music recording and editing needs, deleting it is a great way to remove unwanted or unused software from your Mac.
Part 2: Smart Way to Uninstall Garageband and Clean Garageband Files from Mac?
The smartest way to uninstall Garageband from Mac is by using an app uninstallation tool like Macube Cleaner. Yes, unlike performing the regular app uninstallation process, this tool allows you to quickly uninstall any app and its files occupying your hard drive.
The software ensures that you easily remove GarageBand and all its related files from your Mac computer completely. And it offers many features to help you remove unwanted files within a few minutes. From file shredder to similar image finder, large files finder, duplicate files finder, and lots more. Besides, if you're wondering whether you need advanced knowledge to operate Macube Cleaner, the good news is the tool's interface is user-friendly for anyone, including tech illiterates. So, all you just need is a few clicks to complete any task.
Key Features of Macube Cleaner
- Advanced smart scan that enables you deep scan for junk files on your system.
- Facilitate complete uninstallation of Garageband and its leftover files in just one click.
- Ability to manage startup items, extensions, and more.
- Supports privacy tool that enabled you to remove downloads, caches, and history from your system's browser, including Safari, Chrome, and FireFox.
- Besides app uninstaller, Macube offers other helpful features like large files finder, duplicate file finder, similar image finder, and file shredder to enable you to clean up your Mac storage within a few clicks.
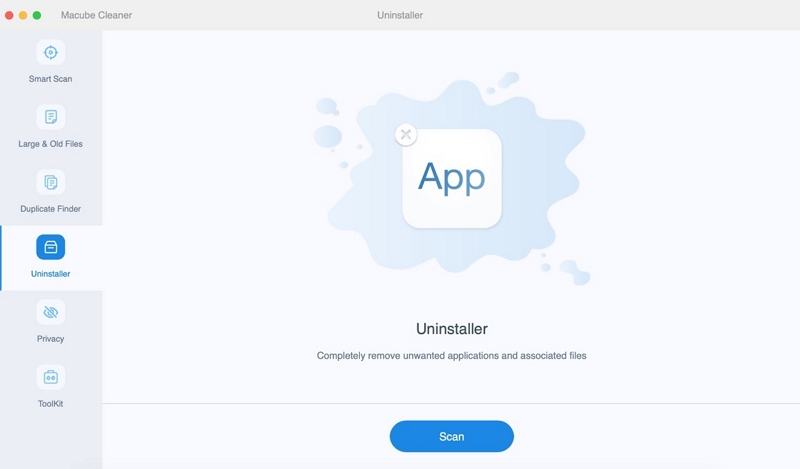
Steps to Uninstall GarageBand with Macube
Step 1: Download and install Macube Cleaner on your Mac. Then, start the program and select the Uninstaller feature at the left-hand side. After that, click the Scan button to initiate a scanning process.
Step 2: Next, the software will display a list of all the apps on your, Mac system. Preview the results, find “GarageBand”, and select it.
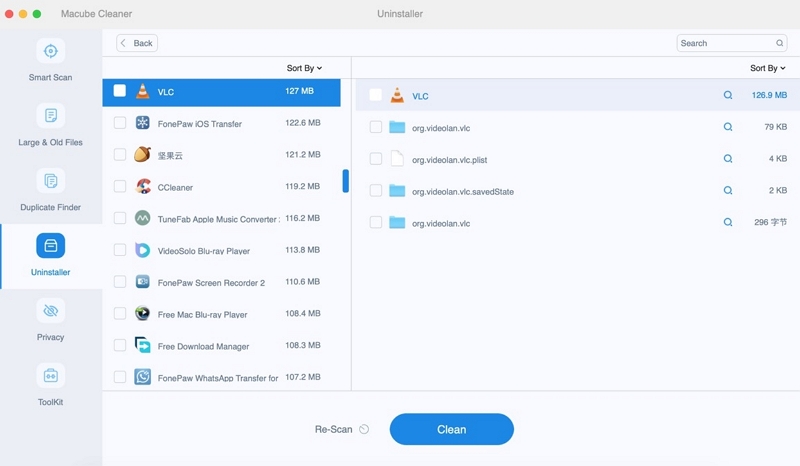
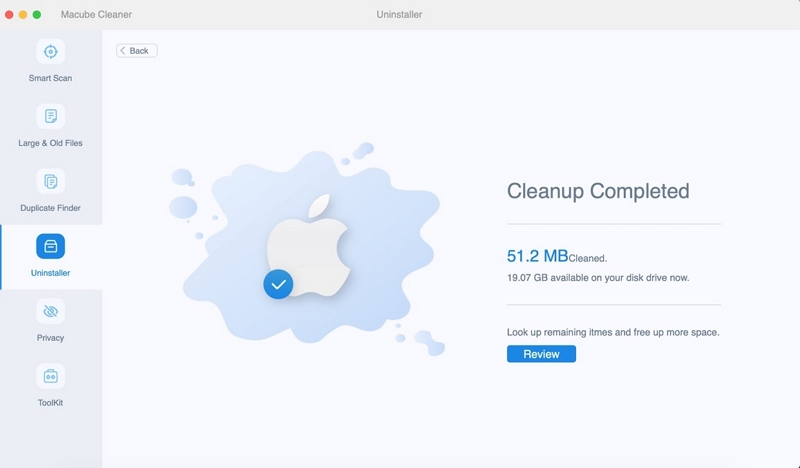
Step 3: Choose the relevant GarageBand-related files and click the Clean button to uninstall GarageBand and its leftover files from your Mac completely.
Part 3: How to Uninstall GarageBand on Mac Manually
Besides using Macube Cleaner, you can also uninstall GarageBand from Mac manually using either Launchpad, Finder, or Terminal. So, if you don't want to install third-party programs for this task, read on to find out how to use these tools for the job.
Method 1: Using Launchpad
Uninstalling GarageBand from Mac using Launchpad is similar to the process of uninstalling apps from your iPhone or iPad. All you just need is to locate the app icon and hold on it for some time. Then, click the relevant button that appears to confirm uninstallation of the app.
Step 1: Open Launchpad from your dock or by pressing F4 on your keyboard.
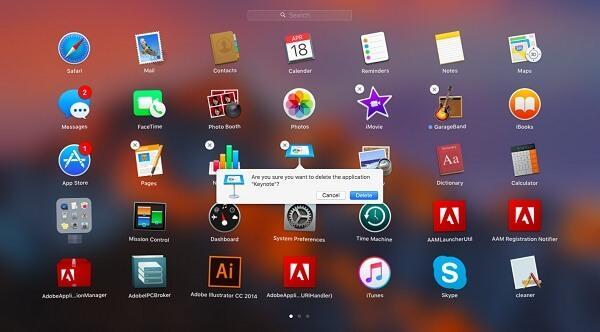
Step 2: Locate GarageBand and click and hold on its icon. After that, hit the X button that shows at the top-left corner of the icon.
Step 3: Click on "Delete" to confirm the uninstallation.
Method 2: Using Finder
Finder is a great option for deleting apps downloaded from or outside the Apple App Store. So, if you're looking to use Finder for the task, the steps below will show you how to operate.
Step 1: Open Finder and navigate to your Applications folder. Then, locate GarageBand and right-click it.
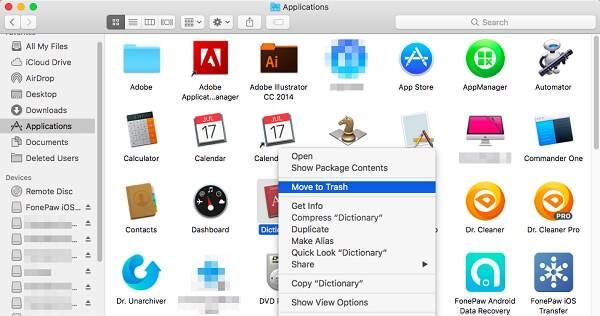
Step 2: Select "Move to Trash" and empty the apps in the trash to delete the GarageBand app on your Mac completely.
Method 3: Using Terminal
Terminal is another reliable technique you can use to uninstall GarageBand on Mac, and you don't need technical knowledge to be able to use it. Here is how it works;
Step 1: Open Finder > Applications > Utilities > Terminal.
Step 2: After that, enter the following command: sudo uninstall file://
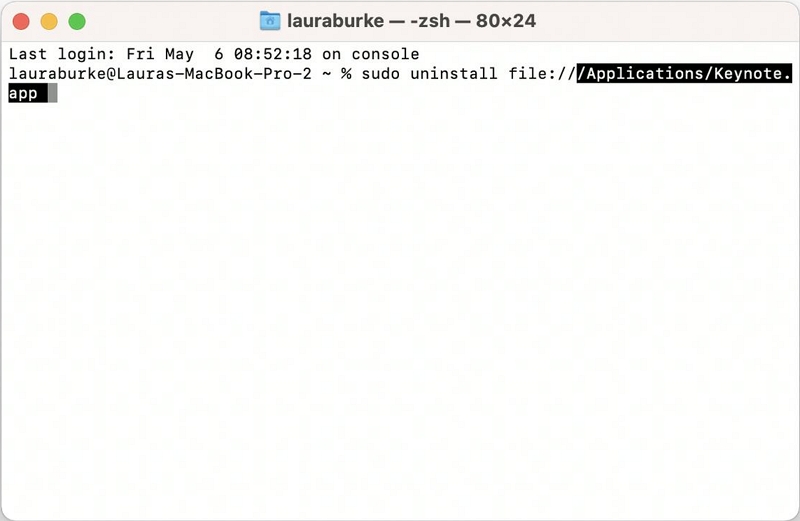
Step 3: Drag the GarageBand app icon into Terminal, automatically updating the path.
Sep 4: Finally, click on the Return button and input your admin password when requested.
After you complete the above, restart your Mac computer.
Part 4: How to Clean GarageBand Files On Mac Manually
Even after uninstalling GarageBand, there may be some associated files left behind on your Mac device. Here's how you can clean them manually:
Step 1: Open Finder and click Command+Shift+G to open the Go To Folder. Then, enter: /Library/Application Support/GarageBand/
Step 2: Choose and delete all files in the following directory: /Library/Application Support/GarageBand/
Step 3: Empty the Trash. Then, from the Finder window, click Command+Shift+G and enter: /Library/Application Support/GarageBand/
Step 4: Select and delete all files in the directory: /Library/Application Support/GarageBand/. Then, empty the Trash once more
Conclusion
Uninstalling GarageBand from your Mac device can help to free up space, enhance performance, and remove unwanted software. Whether you prefer to do so manually or with the help of a third-party tool like Macube, it's important to ensure that all associated files are removed to avoid any potential issues. With the information provided in this article, you should be able to uninstall GarageBand from your Mac device with ease.
Hot Articles
Macube Cleaner
Speed up and troubleshoot your Mac super easily with a Macube full-featured free trial!
Start Free Trial