Maybe you are seeking how to restore your Mac computer to factory settings because:
You want to erase your MacBook Pro/Air, MacBook, iMac to sell or give away the Mac.
Your Mac is running slow or having other problems so that you want to delete everything on Mac to start over.
If that’s the point, here’s exactly the place for you. It is not difficult to erase everything on a Mac and factory reset the MacBook or iMac. But if you want to get it done without losing data, or wipe a Mac securely and completely, there are a couple of things you should do. Just follow this guide to complete all the steps that are needed to securely and completely erase everything on Mac. Your Mac will be successfully factory reset after that.
Quick Check: Mac's operating system to confirm the required method.
If you have a 2018 or newer Mac (all M1 and M2 Macs meet this requirement). As long as you're running macOS Monterey, the reset process is more convenient. Because it's equipped with Apple's T2 security chip, it can take advantage of the new Wipe Assistant feature.
If you're not running Monterey, or your Mac is from 2017 or earlier, you'll have to use a different, more complex operation to factory restore. But don’t worry, the following article provides a variety of solutions, let’s try it together.
For more information about updating systems, check out the articles: 6 Methods to Downgrade MacOS Without Losing Data [Remedy for bygones]
Part 1: Back Up Your Mac Before Factory Reset
There must be some important files on your Mac. Therefore, it is necessary to back up your files before erasing your MacBook or iMac.
Options to back up your Mac before wiping it
Move everything that are important to you to an external hard drive. It is time-consuming but feasible if you have limited documents, photos, videos, etc. that need to be backed up before erasing Mac.
Back up your files on Mac to a cloud storage, such as iCloud. Before doing that, make sure your iCloud account has enough free space.
Make a copy of your Mac data to an external hard drive with a backup program, such as Time Machine, Apple's built-in backup tool for Mac.
Clean junk files to make back up quicker
You can wipe a Mac without losing data by using one of the backup methods mentioned above. And to reduce the size of your Mac's backup and increase the backup speed, it is recommended to clean useless junk files on your Mac before a Time Machine or iCloud backup. Macube Cleaner can easily delete caches, logs, browsing history, duplicate files and photos, large files, useless apps and more from your Mac. What you need to do is to:
Step 1. Download and run Macube Cleaner on your Mac.
Step 2. Select the file type you want to clean, such as system junks, duplicate photos. Click Scan.
Step 3. Click Clean to remove the junks you don't need.
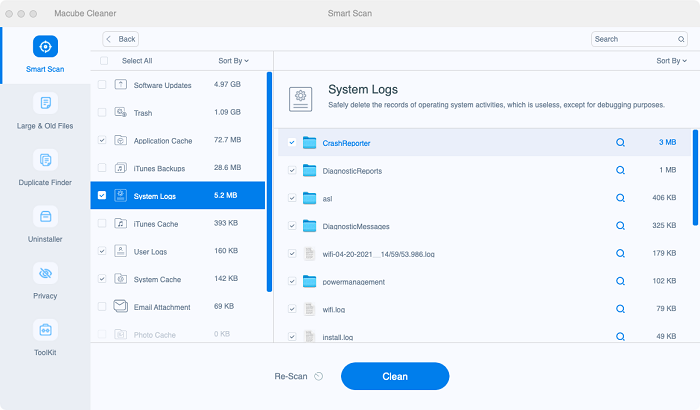
After the cleaning up, go ahead to back up your Mac. The backup will finish more quickly, taking less space of your external hard drive or iCloud account. For a more detailed tutorial, click How to Use Macube Cleaner.
Part 2: Completely Delete Private Files
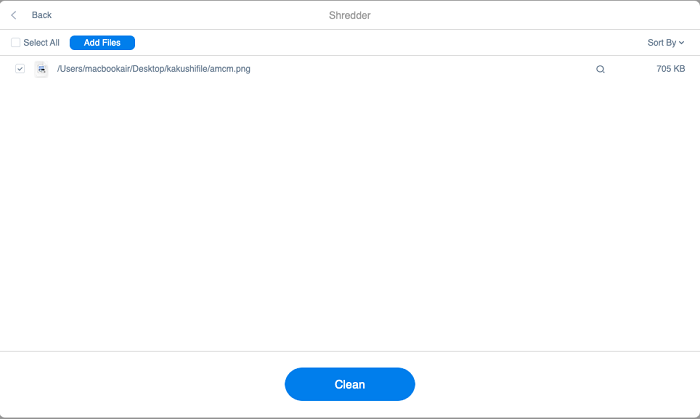
Do you know that files on Mac are actually recoverable after factory reset? That's right. Even though you have factory reset your Mac and erased everything on it, it is still possible to recover the erased files on the Mac with a data recovery program like Eassiy Data Recovery. If you have confidential files on your Mac and don't want to take the risk that somebody may find the files from the formatted Mac after performing data recovery, you can use the Eraser feature on Macube Cleaner to completely delete confidential files on your Mac before factory reset. This feature can erase the trace of a file on the hard drive and make it unrecoverable. Just to:
Step 1. Install Macube Cleaner on your Mac.
Step 2. Click Shredder and select the files you want to destroy.
Step 3. Click Clean to make it unrecoverable.
Part 3: Turn off FileVault
FileVault encryption is an Apple built-in feature that is designed to encrypt your hard drive and files on the hard drive. It is recommended to turn off FileVault before reset and clean install macOS system. Here are the steps to disable FileVault encryption.
Step 1. Open System Preferences > Security & Privacy.
Step 2. On the Security & Privacy window, click the FileVault tab.
Step 3. Click Lock button and you will need to enter password of the administrator account the unlock FileVault settings.
Step 4. After entering the password, you are able to click Turn Off FileVault. Click it.
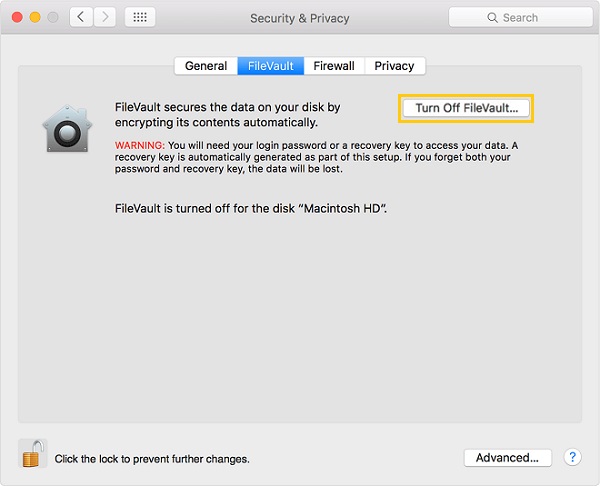
All files on your Mac will be dencrypted after FileVault is off.
Part 4: Factory Reset a MacBook Air or MacBook Pro (For macOS Monterey or newer Mac)
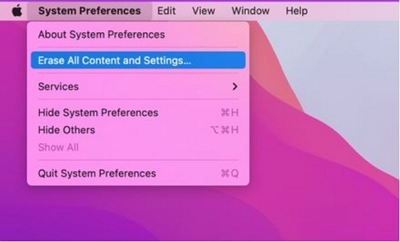
If you are using macOS Monterey or macOS Ventura or newer, you can complete a factory reset in just a few steps. Proceed as follows:
Step 1: Open Erase Assistant feature.
For macOS Monterey:
Open the Apple menu > System Preferences > Erase All Content and Settings.
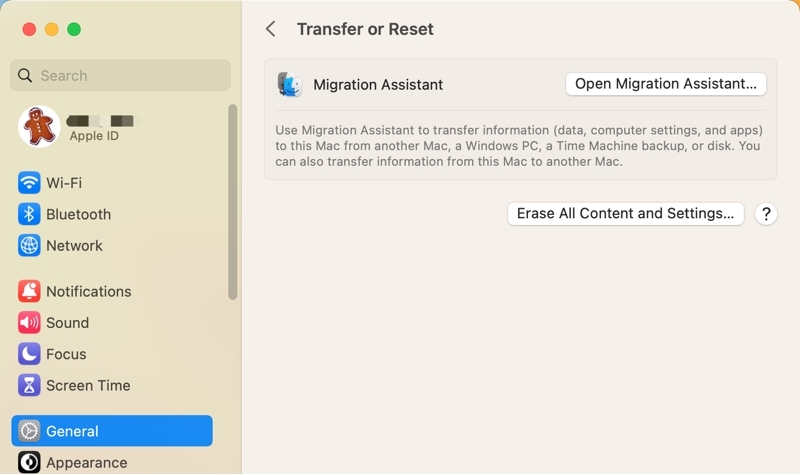
For macOS Ventura or newer Mac
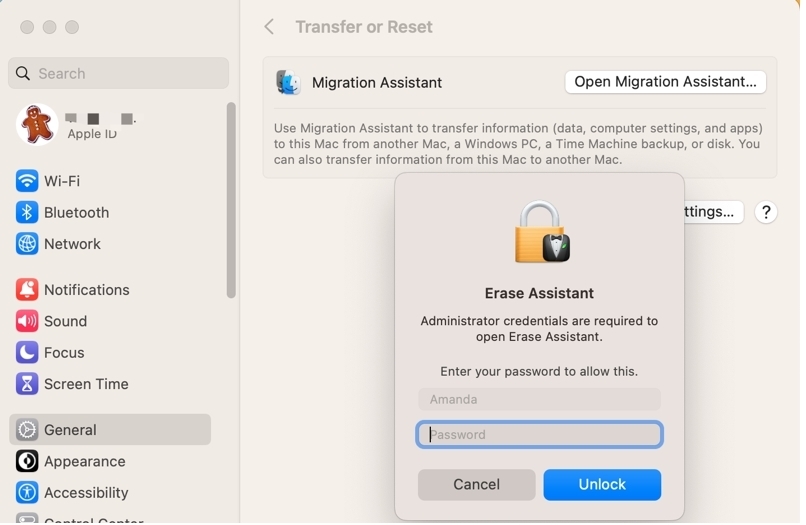
1.Open the Apple menu, choose the System Settings, then click General on the menu bar. Select Transfer and Reset, and click on the Erase All Content and Settings button.
2. Input your administrator password to unlock Erase Assistant.
Step 2: Click Continue to confirm deletion of all settings and data on your Mac.
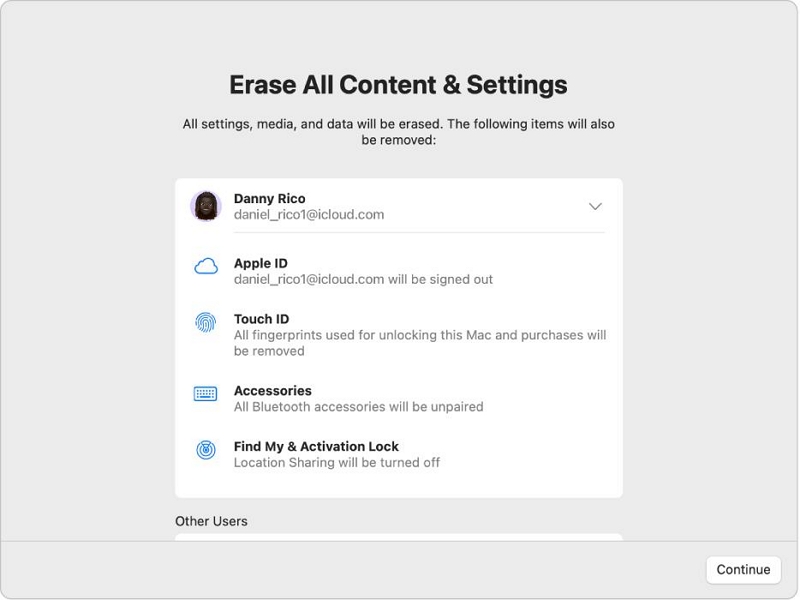
Step 3: Click Erase All Content & Settings again to start the erase process. (Enter your Apple ID password to log out of your account if asked.)

The Mac restarts and shows a black screen or progress bar. Your Mac will reboot and revert to factory Settings.
Part 5: Erase MacBook, MacBook Air/Pro, iMac[with an Intel chip or macOS Big Sur and older]
#1 Remove iTunes Authorization and iCloud Account
I believe you don't want your iTunes or iCloud account to be linked to your MacBook or iMac after you sell your Mac or give it away. By the way, you can authorize only 5 computers with your iTunes account, so there’s no reason to lose an allocation to a Mac that you no longer own. Therefore, before erasing your MacBook or iMac, you should first deauthorize iTunes and disable iCloud on your Mac.
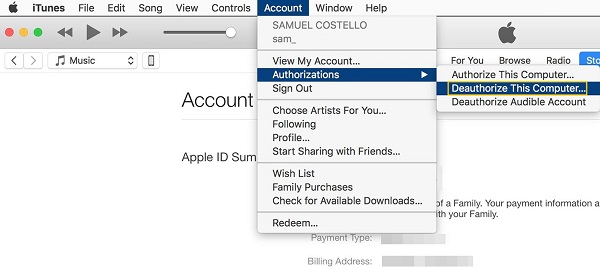
A. Deauthorize iTunes on Mac
Step 1. Open iTunes on Mac. Click Account > Authorizations > Deauthorize This Computer.
Step 2. You'll need to enter the password of your Apple ID. Then click Deauthorize.
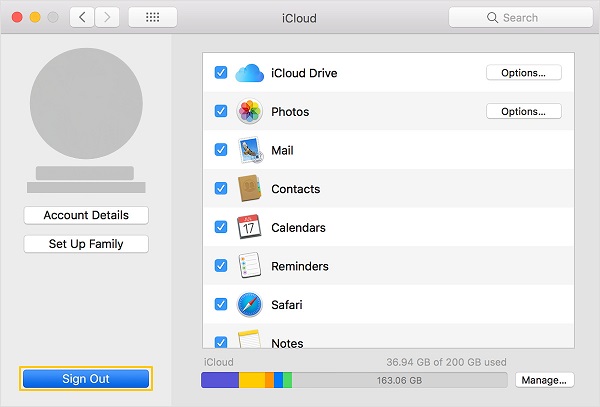
B. Sign out of iCloud on Mac
Step 1. Open System Preference > iCloud. Click Sign Out. A window will pop up, asking whether you want to keep a copy of your iCloud data on the Mac.
Step 2. Deselect all the options and click Continue, which will ensure that your iCloud data won't stay on the Mac.
C. Sign out of iMessage on Mac
Also, don't forget that your iCloud account can also be used to receive iMessage. So run Messages, click Preferences > Accounts to sign out of iMessage.
 Tips:
Tips:
- If you have devices that are paired with your Mac via Bluetooth, remember to check and unpair them at Apple menu > System Preferences > Bluetooth before you wipe your Mac.
After finishing the above steps, you are now officially able to wipe your MacBook, MacBook Pro, MacBook Air or iMac. You need to erase your Mac in recovery mode.
#2 Enter your Mac into recovery mode
Power off your Mac and then reboot it. As it is rebooting, press and hold Command + R (Option + Command + R or Shift + Option + Command + R) until you see the Apple logo.
Generally, you can use Command + R combination to enter the Recovery mode. If you need to upgrade you need to the latest macOS compatible with your Mac, use Option + Command + R; If you want to clean install the macOS that came with your Mac, use Shift + Option + Command + R.
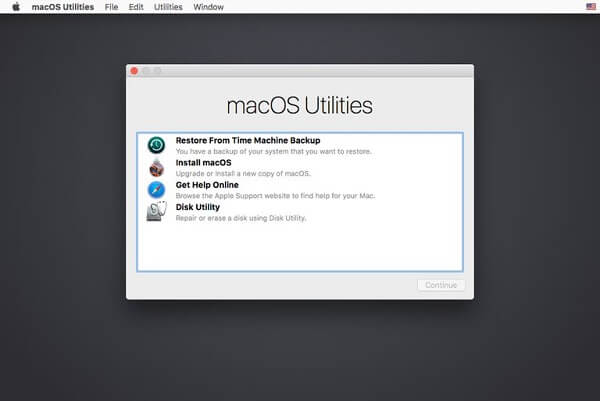
#3 Erase everything on your Mac
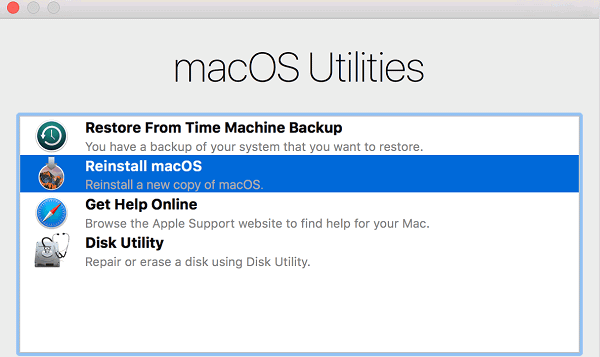
When you are in recovery mode on Mac, you will see the macOS Utilities menu.
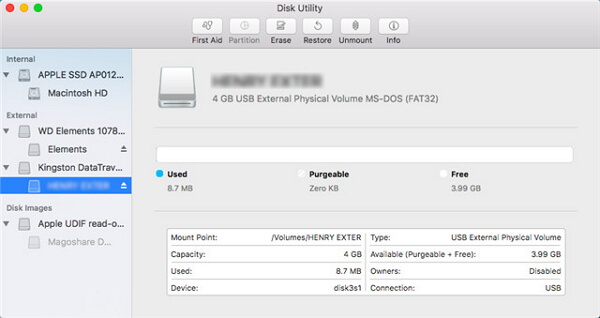
Step 1. Select Disk Utility.
Step 2. Select the disk to erase. To erase everything on your Mac, you usually should choose the main hard drive named Macintosh HD.
Note:
- If the Mac is running High Sierra or later, Disk Utility will show all the Macs linked with your Apple ID under Macintosh HD. So be careful not to delete the drive of other Macs.
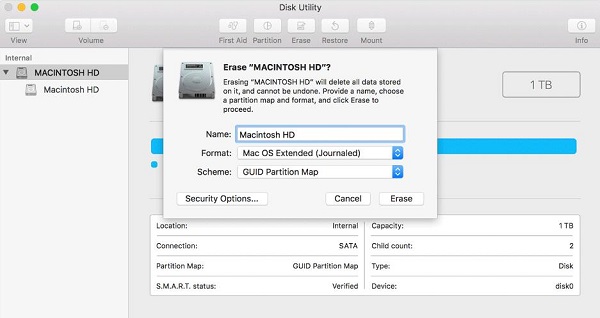
Step 3. Click Erase. Then you need to enter name and format of the drive. You can choose either APFS or Mac OS Extended (journaled) to reformat the Mac. APFS is a new file system introduced by Apple since High Sierra, which is more recommendable. Click Erase to begin wiping everything on your Mac.
Bonus: Reinstall macOS on MacBook, iMac
After deleting everything on your Mac, you can now reinstall macOS. Go back to macOS Utilities menu. Select Reinstall macOS and follow the on-screen instructions to finish.
That's all about how to factory reset your Mac and erase everything. If you have more question, drop it in the comment section.
